Building my homelab AI cloud with a Turing Pi cluster board and NVIDIA Jetson TX2 NX module
Table of Contents
- Introduction, and why?
- Things you're going to need
- Setting Up the Turing Pi cluster board
- Flashing the Jetson TX2 NX Module
- Configure the TX2 NX module as a server
- Install JetPack SDK components
- Done
- Summary
Introduction, and why?
In this first post, I step you through my journey of integrating the NVIDIA Jetson TX2 NX module into a Turing Pi cluster board as an affordable approach of setting up a powerful AI cloud in the comfort of your own homelab. I intend for this to be the first in a series of posts tailored to learners, tech tinkerers, and aspiring developers who are keen to experiment with AI technologies without the steep costs typically associated with high-end infrastructure.
While cloud solutions from industry experts (like AWS, Azure, and Google) are readily available and convenient, building your own solutions provides invaluable insights and a deeper understanding of the underlying technology. By taking the DIY route, you gain a granular understanding of each component and process, providing you with a comprehensive view of AI cloud systems.
This series is not just about reaching the end goal but about appreciating the journey itself. The knowledge gained from hands-on involvement in assembling and configuring your AI cloud empowers you with the confidence to make informed decisions, troubleshoot issues, and innovate with the technology at hand.
Fair warning: As we proceed, remember that the path may not be one-size-fits-all. The steps I share are from my own experiences, filtering out the errors along the way. You might come across other troubles, or even find simpler ways of doing things, but my hope is that by sharing this knowledge, you'll be equipped with the best chance of success. Be prepared to invest time, energy, and a modest amount of cash - after all, the rewards will be worth it. You should be as comfortable with the chance of breaking things and starting over. And, crucially, secure the blessing of your family; you might just disappear into your lab a little longer than expected.
Note: I have the Turing Pi cluster board version 2.4, at time of writing, Turing Machines are getting ready to release version 2.5. If instructions change on the 2.5 version, once it's released and I have my hands on one, I will update this walkthrough.
Note: I have received no sponsorships from any companies or people mentioned in this article, although offers would be very welcome 😉. I wanted to add that I have received great technical and customer support from Turing Machine themselves, right from early Kickstarter days through to now as a formed company - maybe I'll write a future blog post about how I blew the fuses on my board and corrupted the onboard flash - with Turing Machine's help I recovered and I'm still using my original board with no problems.
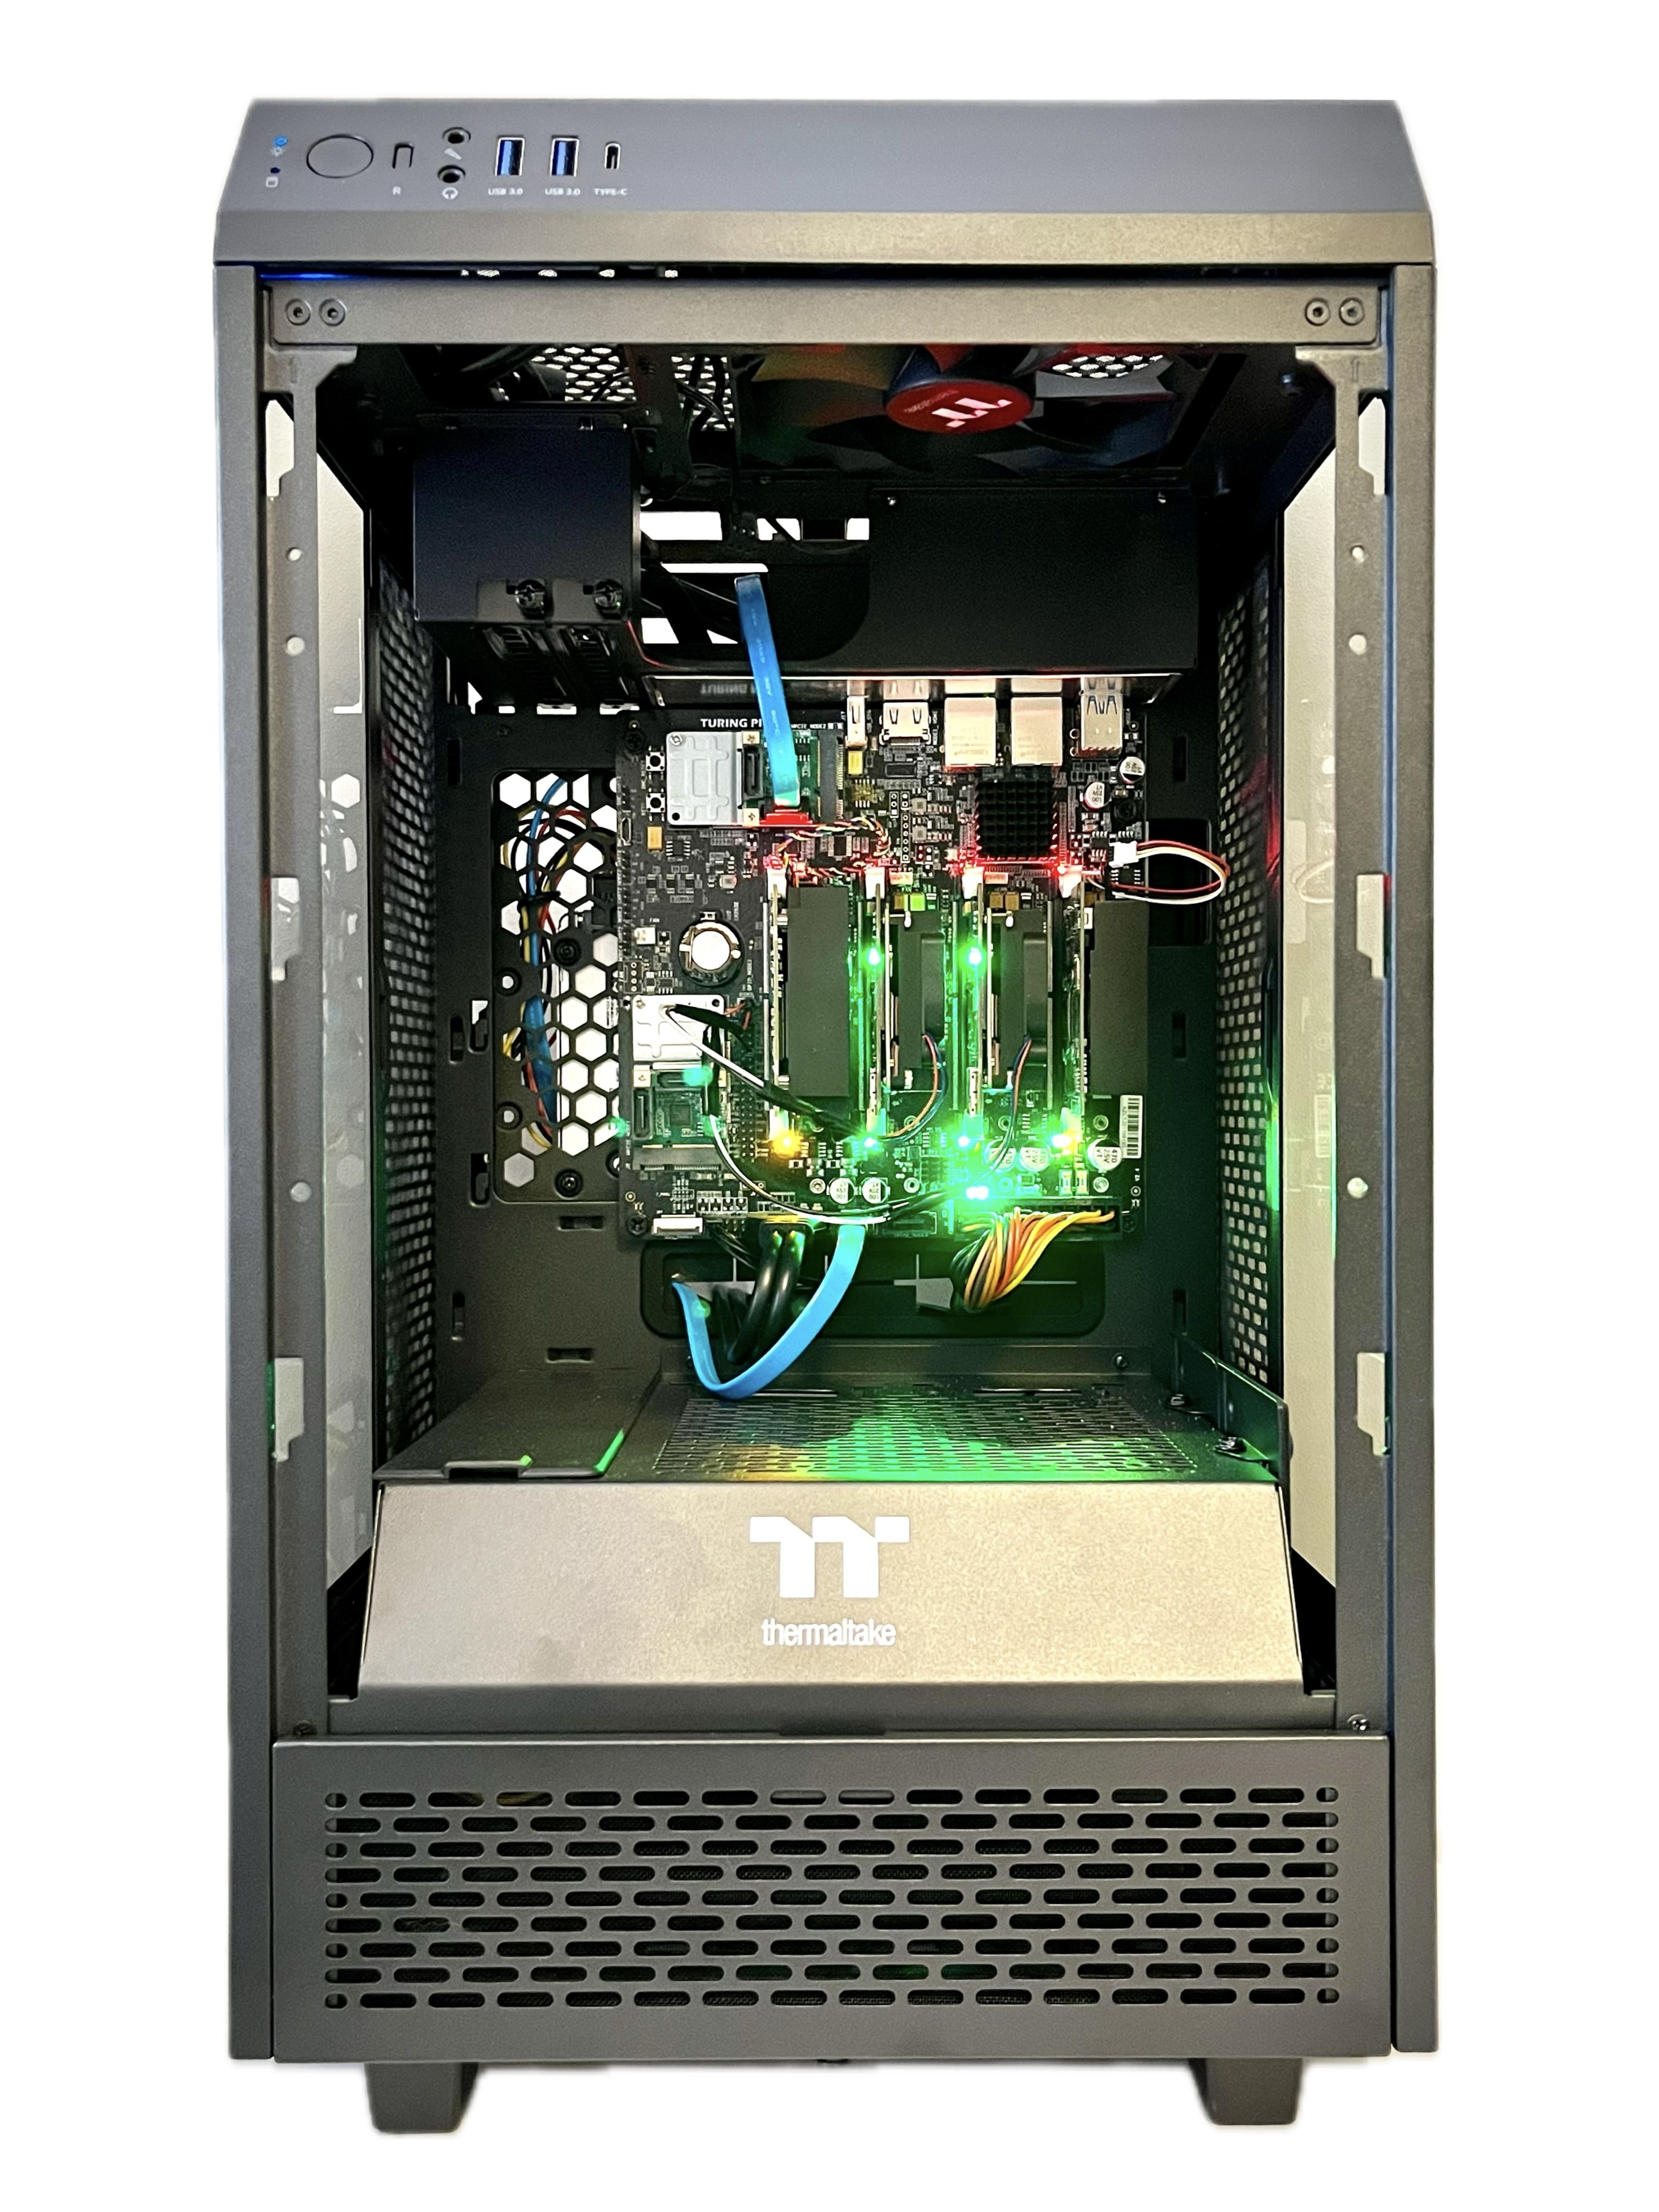 Image (updated 2024-03-17): Now showing Turing Pi cluster board, with Turing RK1, 2 x Raspberry Pi CM4, and the NVIDIA Jetson TX2 NX module (left to right) in a Thermaltake 'The Tower 100' black mini chassis.
Things you're going to need
A reminder, these worked for me, you might need to adjust for your own needs, but this walkthrough is based on the following:
- Turing Pi cluster board
- NVIDIA Jetson TX2 NX module
- Optional (but not really, if you want to use full speed of the TX2 NX module): Active heat sink for NVIDIA Jetson TX2 NX
- External storage, like an M.2 NVMe SSD drive
- Host computer running Ubuntu 18.04 (see options to run Ubuntu 18.04 below)
- Optional: USB-to-TTL-serial cable, I use this one
Setting Up the Turing Pi cluster board
I found setting up the Turing Pi cluster very straightforward, thanks to the comprehensive guides available on the Turing Pi docs site.
The board supports a range of compute modules, my current setup consists of 2 x Raspberry Pi CM4 modules and the NVIDIA Jetson TX2 NX. I am expected delivery of Turing Machines' RK1 module board.
I recommend following their instructions to prepare your cluster board for other modules and on how to install the NVIDIA Jetson TX2 NX module and the active heatsink into the board physically.
Follow the rest of this blog post for a walkthrough of setting up the NVIDIA Jetson TX2 NX module once physcially installed into the board.
Flashing the Jetson TX2 NX Module
Prerequisites
Ubuntu 18.04 on a host machine
The Jetson TX2 NX module only supports JetPack 4.x. JetPack 4.x only supports up to Ubuntu 18.04. I found it most stable to install NVIDIA SDK Manager (their flashing tool) also onto Ubuntu 18.04. There are multiple methods to host Ubuntu 18.04 and SDK Manager, here are the options I've tried, ordered by stability:
-
Most stable: native boot of Ubuntu 18.04 Desktop image installed onto a machine
-
Boot off an Ubuntu Live USB stick. You could use tools like UNetbootin or Rufus to create a bootable USB
-
Docker image (instructions availble from the SDK Manager installation page)
-
VMWare Virtual Machine on Windows (make sure to associate the USB port/device of the Jetson module to the virtual machine, even after the module reboots it needs to reconnect)
-
At the time of writing, Parallels Desktop on macos did not work
Connect the module to the host machine
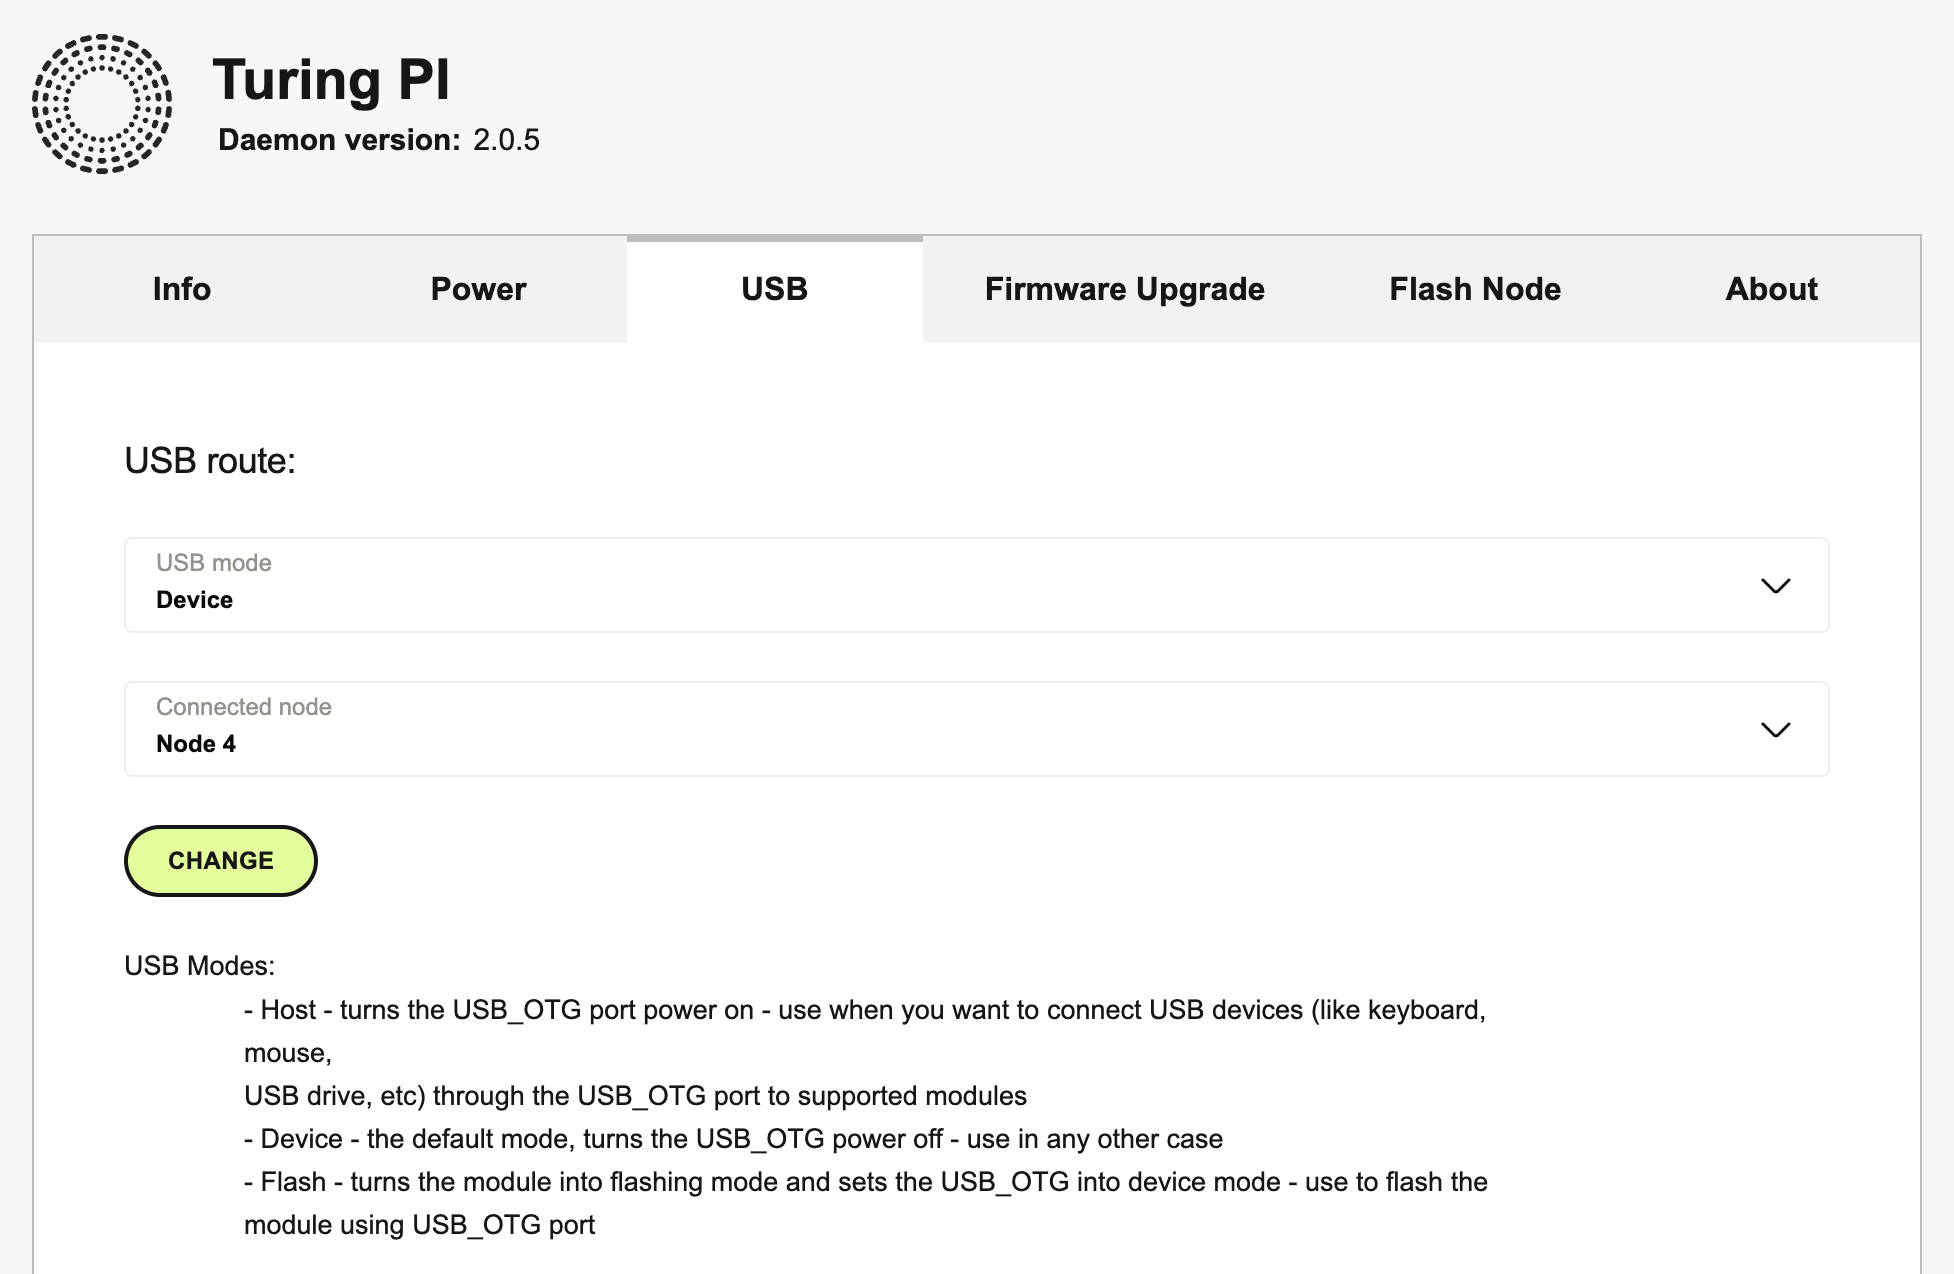
I'm using the Turing Pi 2.4 board with BMC firmware version 2.0.5. The Turing PI cluster board node modes (like power, USB, etc) can be controlled using the BMC UI, or the tpi tool via CLI.
-
Connect the cluster board USB_OTG (port USB A-to-A cable/adapter required) to the host machine
-
Put the node on the cluster board into 'device' mode.
Note: I found that if I'd already flashed the module (or I'm coming back to install SDK components later in the article) then I needed 'host' mode.
-
Example using
tpitpi usb device -n 4 #replace '4' with the node your module is in# ortpi usb host -n 4 -
Example using the BMC UI
- Test the device is connected
You should see an NVidia Corp. device deteced by running lsusb on the host machine.

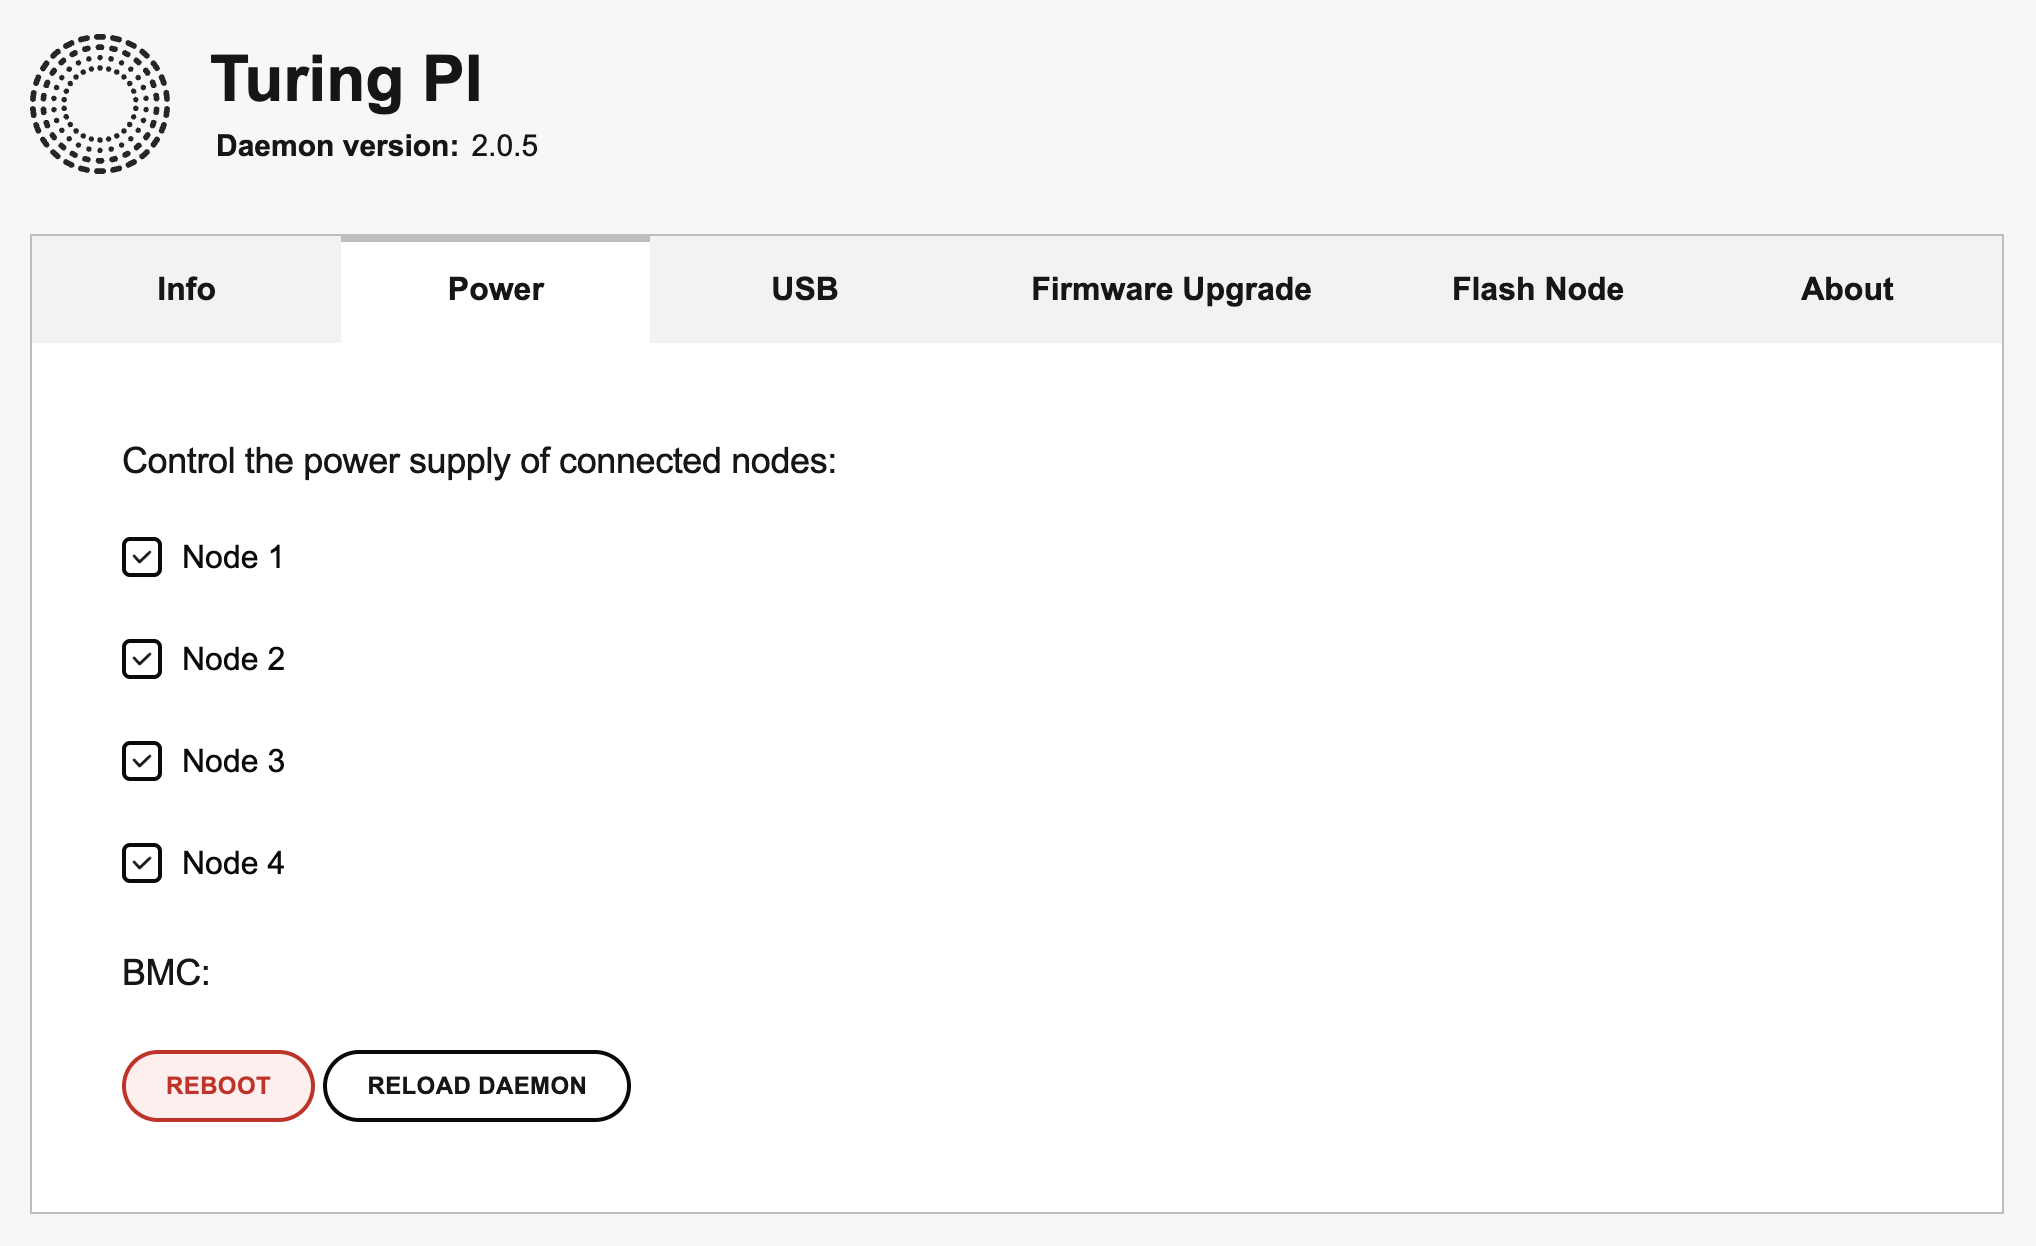
- Put the module into Forced Recovery mode
For the TX2 NX this is done by powering down the module (the node power in the cluster board) and immediately powering back up again
-
Example using
tpi# Assuming the module is already ontpi power -n 4 off #replace '4' with the node your module is intpi power -n 4 on -
Example using the BMC UI
NVIDIA SDK Manager
-
On your Ubuntu 18.04 desktop, download and install NVIDIA SDK Manager
-
Start SDK Manager and login to the app. It might ask you to install the latest version of JetPack, if this is more than JetPack version 4.x then click
Lateras we need 4.x -
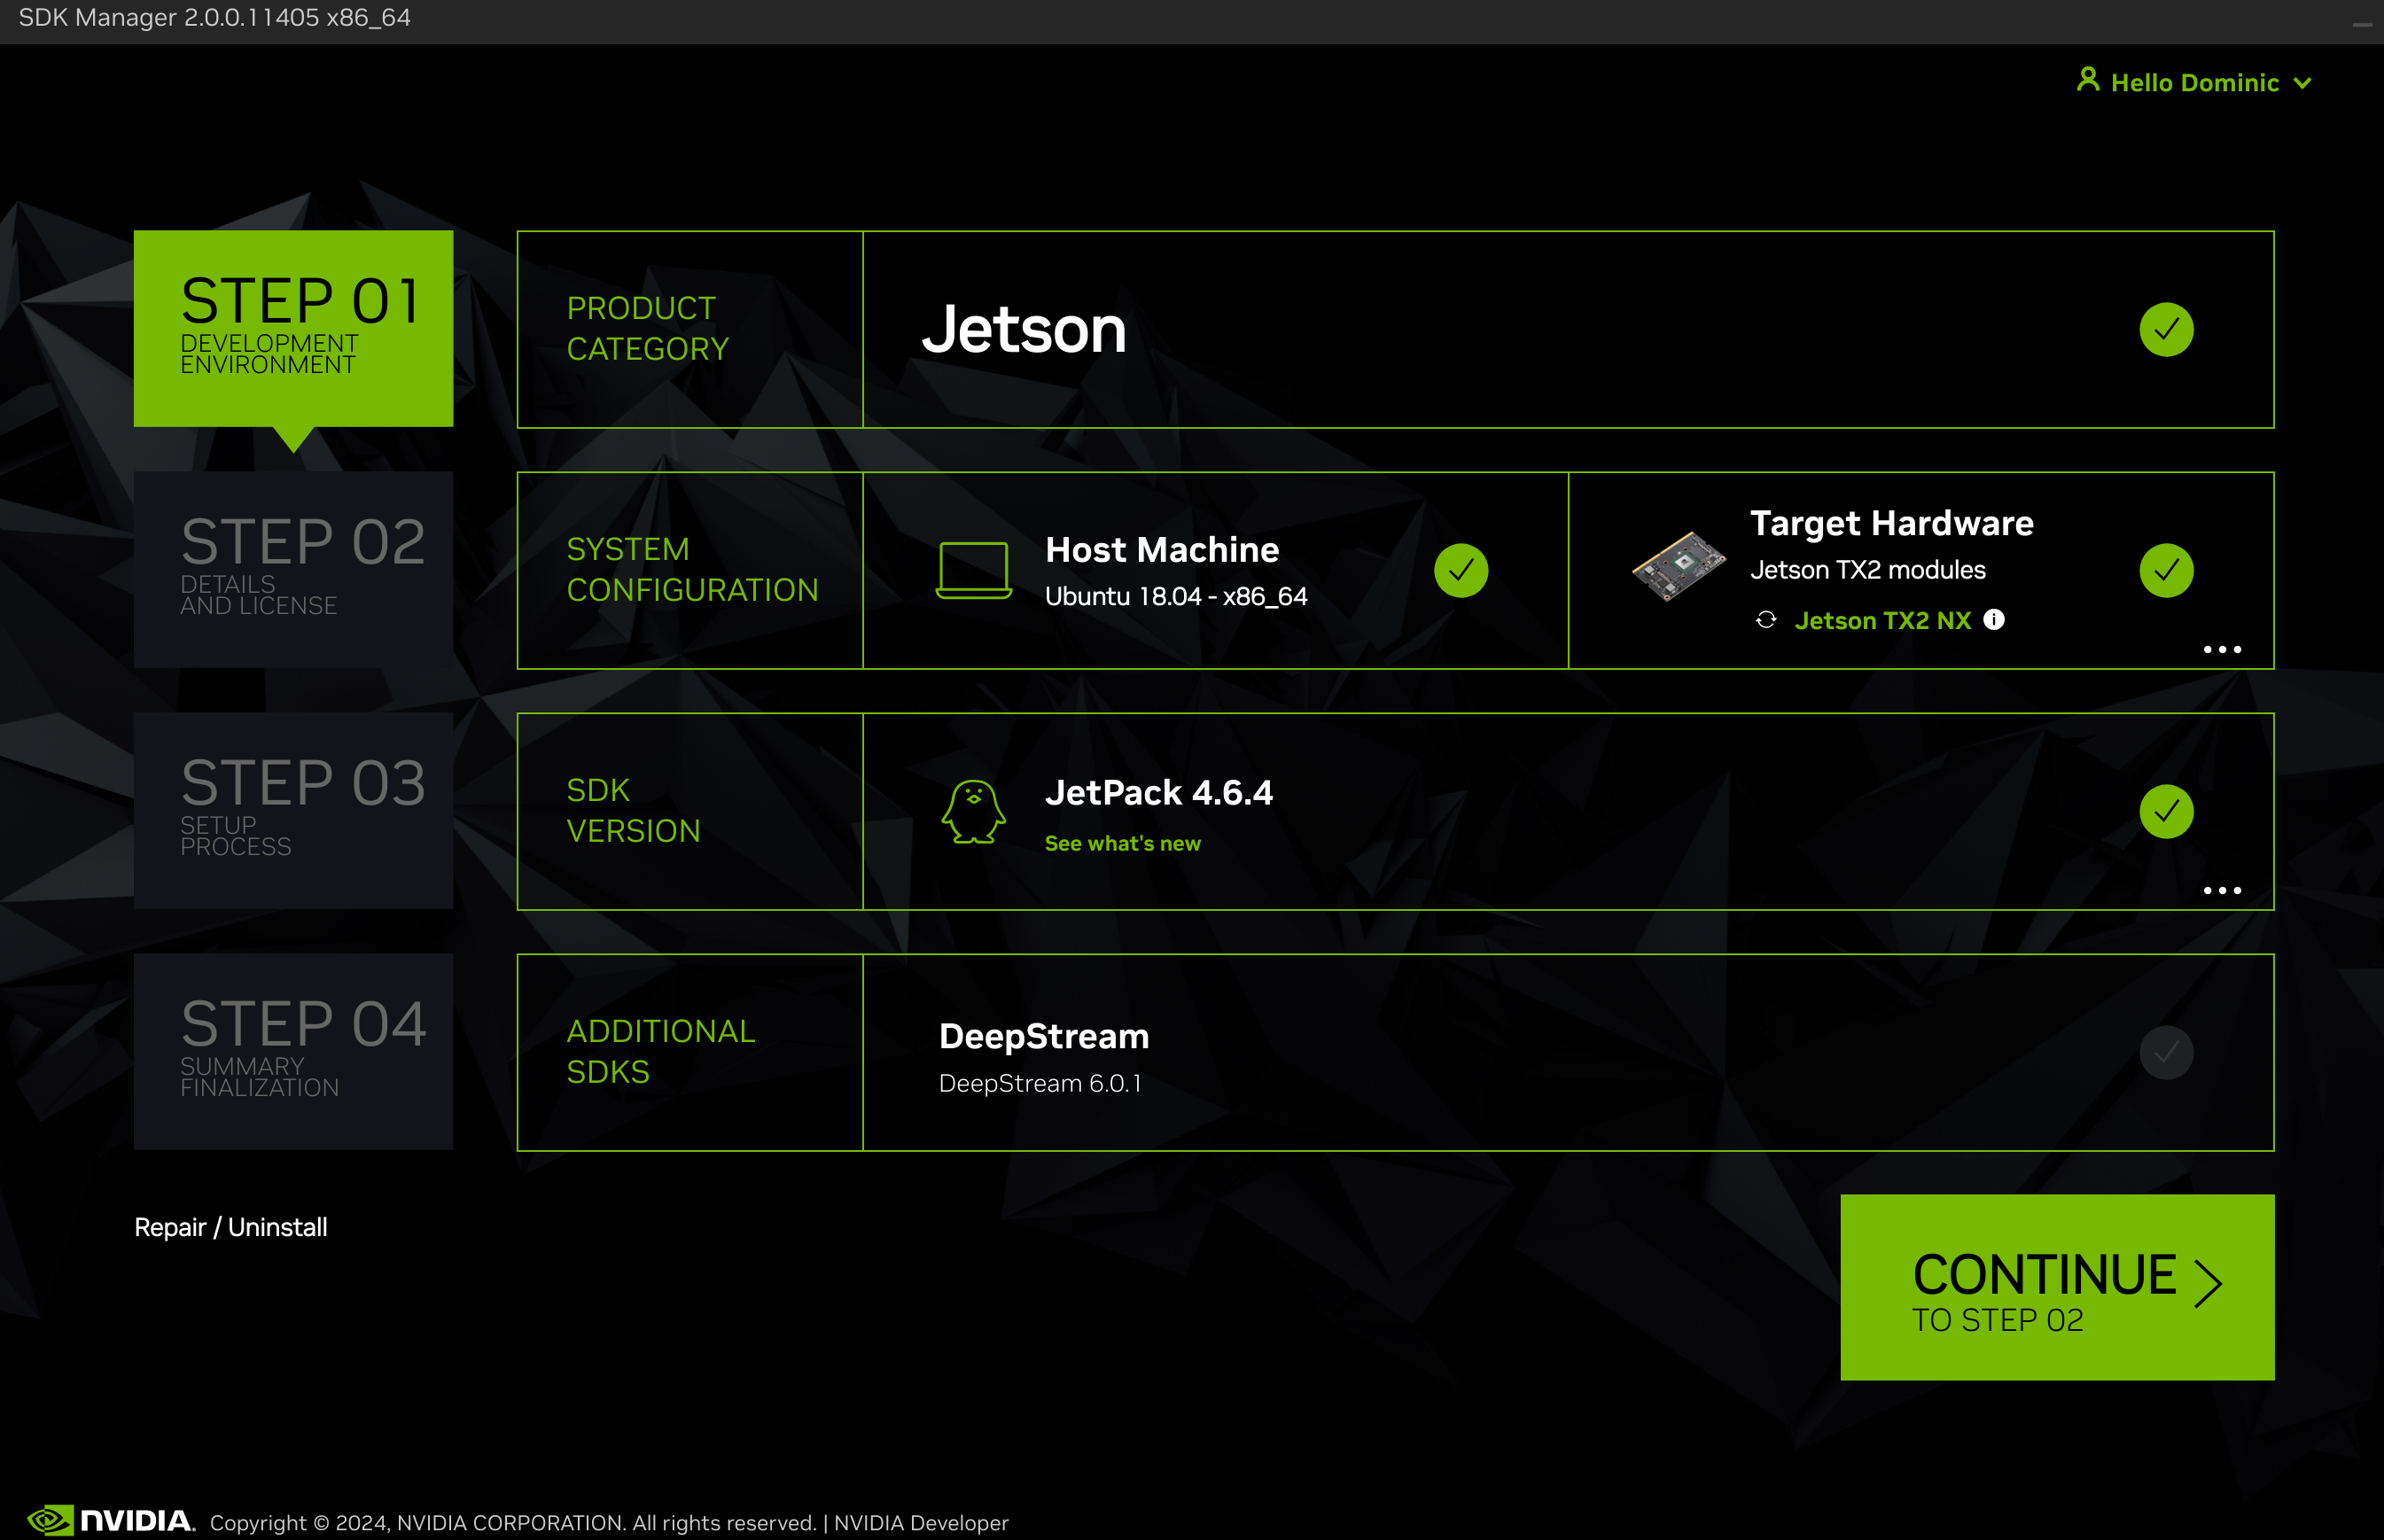
If all has gone well - you should see your Jetson TX2 NX module listed in the
Target Hardwaresection and the latest supported JetPack version for the module (at the time of writing this if 4.6.4). You might to click in either section to choose the device and JetPack version. Keep and additional SDKs unselected at this point (like DeepStream)
Flashing the module's internal eMMC storage with the base Jetson Linux OS
I found using the SDK Manager for this first flash never completed, so below is a method to do this via CLI.
You're going to want exernal storage as there is very limited disk space on the internal 16GB eMMC 5.1 flash storage, however the NVIDIA Jetson TX2 NX module uses boot firmware that is stored only on internal eMMC storage, it cannot boot from external storage (like an SSD drive) until the internal eMMC has been flashed.
As of 2024-02-16 the latest version of Jetson Linux OS supported by the module was R32.7.4.
- Download the Driver Package (BSP) and Sample Root Filesystem from Jetson Linux R32.7.4 | NVIDIA Developer,
Or, using wget
wget https://developer.nvidia.com/downloads/embedded/l4t/r32_release_v7.4/t186/jetson_linux_r32.7.4_aarch64.tbz2
wget https://developer.nvidia.com/downloads/embedded/l4t/r32_release_v7.4/t186/tegra_linux_sample-root-filesystem_r32.7.4_aarch64.tbz2- Prepare the filesystem
export L4T_RELEASE_PACKAGE='jetson_linux_r32.7.4_aarch64.tbz2'export SAMPLE_FS_PACKAGE='tegra_linux_sample-root-filesystem_r32.7.4_aarch64.tbz2'
tar xvf ${L4T_RELEASE_PACKAGE}cd Linux_for_Tegra/rootfs/sudo tar xvpf ../../${SAMPLE_FS_PACKAGE}cd ..- Prepare the firmware
# From the `Linux_for_Tegra` foldersudo ./apply_binaries.sh sudo ./tools/l4t_flash_prerequisites.sh- Prepare for a headless installation by setting the default username, password and hostname for the module
# From the `Linux_for_Tegra` folder# <username> - replace with your user name# <password> - replace with your password# <hostname> - replace with the hostname to use in your network (also for the ssh connections)# -a - autologin, if you are going to use desktop
sudo ./tools/l4t_create_default_user.sh -u <username> -p <password> -a -n <hostname>
Note: you can skip this, but as the Turing Pi cluster board does not expose HDMI (on any node other than node 1) or USB devices (on any node other than node 4) by default (without additional components for the board) then the module will sit waiting for setup via GUI. Preparing in advance means you can connect via SSH after flashing.
- Flash the device
# From the `Linux_for_Tegra` folder# We use the device name `jetson-xavier-nx-devkit-tx2-nx` even though we're not using the DevKit board - this still works for our modulesudo ./flash.sh jetson-xavier-nx-devkit-tx2-nx internal-
This will flash the Jetson Linux OS (Ubuntu 18.04) to the module, it might take some time
-
After it has finished flashing, the module should automatically reboot itself and you should be able to SSH into the module using the hostname, username and password you set.
ssh username@hostnameNote: If your router doesn't resolve hostnames automatically (mDNS) then you will need to find the IP address of the module that has been assigned via DHCP and use that to login via SSH
ssh username@10.10.10.100I reserve IPs via my router for devices based on their MAC address, but once you have logged into the module via SSH, you could also setup a static IP address if needed.
-
You can run a few commands to check things look normal, in the context of Jetson Linux OS:
-
Run the
tegrastatscommand. Expected results would be the specification values for active CPUs and GPUs reflected in the output, something like:tegrastatsWhich should output repeated lines like
RAM 890/3825MB (lfb 184x4MB) SWAP 0/1913MB (cached 0MB) CPU [0%@2035,0%@2035,0%@2035,3%@2035,0%@2035,0%@2035] EMC_FREQ 0% GR3D_FREQ 0% PLL@40.5C MCPU@40.5C PMIC@50C GPU@39C BCPU@40.5C thermal@39.9C -
Check the kernal version:
uname -rWhich should output something like
4.9.337-tegra
-
Flashing and booting from external storage
Now that the module's internal storage is prepared - before we continue with any other device setup - we can switch to botting from external storage. The internal storage still holds the boot firmware but we can ignore it from this point forward.
The Turing Pi cluster board has SATA, mPICe and M.2 (NVMe) mappings to different nodes. The TX2 NX module supports all of these so you can choose how to connect external storage.
I'm using an M.2 NVMe SSD drive. I installed the NVMe drive into the corresponding M.2 port for the module's slot. I have chosen node 4 on the board, as this keeps nodes 1-3 and their SATA or SATA-via-mPICe connections free for stoage on other modules.
You could flash the NVMe drive by connecting it directly to the host computer or, like I did, via the cluster board and TX2 NX module. NVIDIA have some archived instructions on how to setup external drives (like NVMe) for booting, which through trial and error I have adjusted to:
From the TZ2 NX module, via SSH
- Check the NVMe drive's device name
lsblk -d -p | grep nvme | cut -d\ -f 1 # Note that there must be two spaces after the ‑d\Which should something like
/dev/nvme0n1- Specify the partioning standard to use, this should be GPT in most scenarios
sudo parted /dev/nvme0n1 mklabel gpt- Add the
APPpartition
Depending on the size of your drive, choose a size for the APP parition. It needs to be at least 16GB but you're going to want enough size to add apps over time (without needing to store on different mounted partitions). The NVMe drive I'm using is 500GB so I've chosen 100GB for the APP partition
sudo parted /dev/nvme0n1 mkpart APP 0GB 100GBAssuming your disk was empty then the first partition is created at /dev/nvme0n1p1.
- Initialise/format the
APPpartition as anext4filesystem
sudo mkfs.ext4 /dev/nvme0n1p1- Temporarily mount the partition
sudo mount /dev/nvmeXn1p1 /mntFrom the host computer
- Prepare the raw system image
# From the `Linux_for_Tegra` foldersudo BOOTDEV=nvme0n1p1 ./flash.sh --no-flash jetson-xavier-nx-devkit-tx2-nx nvme0n1p1sudo mkdir tmp_systemsudo mount bootloader/system.img.raw ./tmp_system- Sync the filesystem to the temporarily
/mnton the module
# <username> - replace with username on the module# <host> - replace with the hostname or IP address of the modulesudo rsync -axHAWX --numeric-ids --info=progress2 --exclude=/proc ./tmp_system/ <username>@<host>:/mntFrom the TX2 module, via USB-to-TTL-serial cable or via BMC CLI with picocom
- Connect your host via USB-to-TTL-serial cable to the appropriate pins on the cluster board and setup your host for USB-to-TTL or use BMC CLI and
picocom.
You should then see the modules serial console.
-
Via SSH reboot the module (not power-off-and-on which would force into recovery mode) and monitor the serial console. Be ready to
Hit any key to stop autobootwhich should then load the U-Boot prompt -
You could first test the boot from NVMe drive
# In the U-Boot promptbootcmd_nvme0Then you'll need to repeat step 9 to get back into the U-Boot prompt.
- Update the boot order via the
boot_targetsvariable
# In the U-Boot promptsetenv boot_targets "nvme0 mmc1 mmc0 usb0 pxe dhcp"saveenvBefore rebooting, double check the variable is set correctly
# In the U-Boot promptprintenv boot_targets- Via SSH reboot the module (not power-off-and-on which would force into recovery mode). After reboot, you can check you are booted from the NVMe card by using something like the
dfcommand
# Via SSH into the moduledf -hWhich should show root / mounted to /dev/nvme0n1p1
Filesystem Size Used Avail Use% Mounted on/dev/nvme0n1p1 92G 15G 73G 17% /...Configure the TX2 NX module as a server
Via SSH into the module:
- Install
jetson-stats, which is a useful tool that gives you more information that the default linuxtoporhtop
sudo pip3 install -U jetson-stats- Check fan control profile
-
Load
jetson-statsjtop -
Press
6to go into the fan control section and check that the fan control profile is set to[temp control]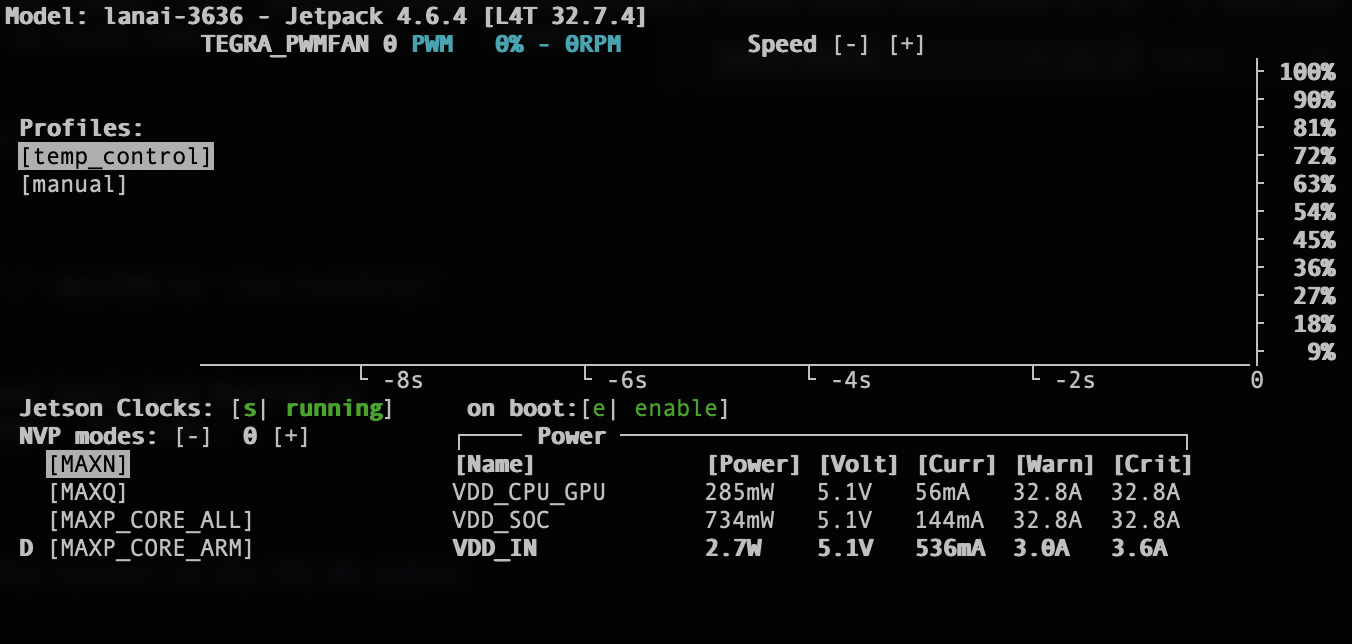
- As we're not going to use the module's desktop GUI very often we can stop it running on boot to give us more CPU and memory for our projects
sudo systemctl set-default multi-user.targetsudo rebootIf you want to enable the desktop GUI again
sudo systemctl set-default graphical.targetsudo rebootInstall JetPack SDK components
-
Reconnect your module to the host machine but specifically in
hostmode this time. There is no need to put the device intoForced Recovery mode(step 4 in that section) for this step. -
Load SDK Manager
-
Click 'Continue to step 2'
-
You can choose whether you need any
Host Componentsand whichJetson SDK Componentsyou want. Make sure thatJetson OS(image and flash) is unselected as we've already flashed our module.
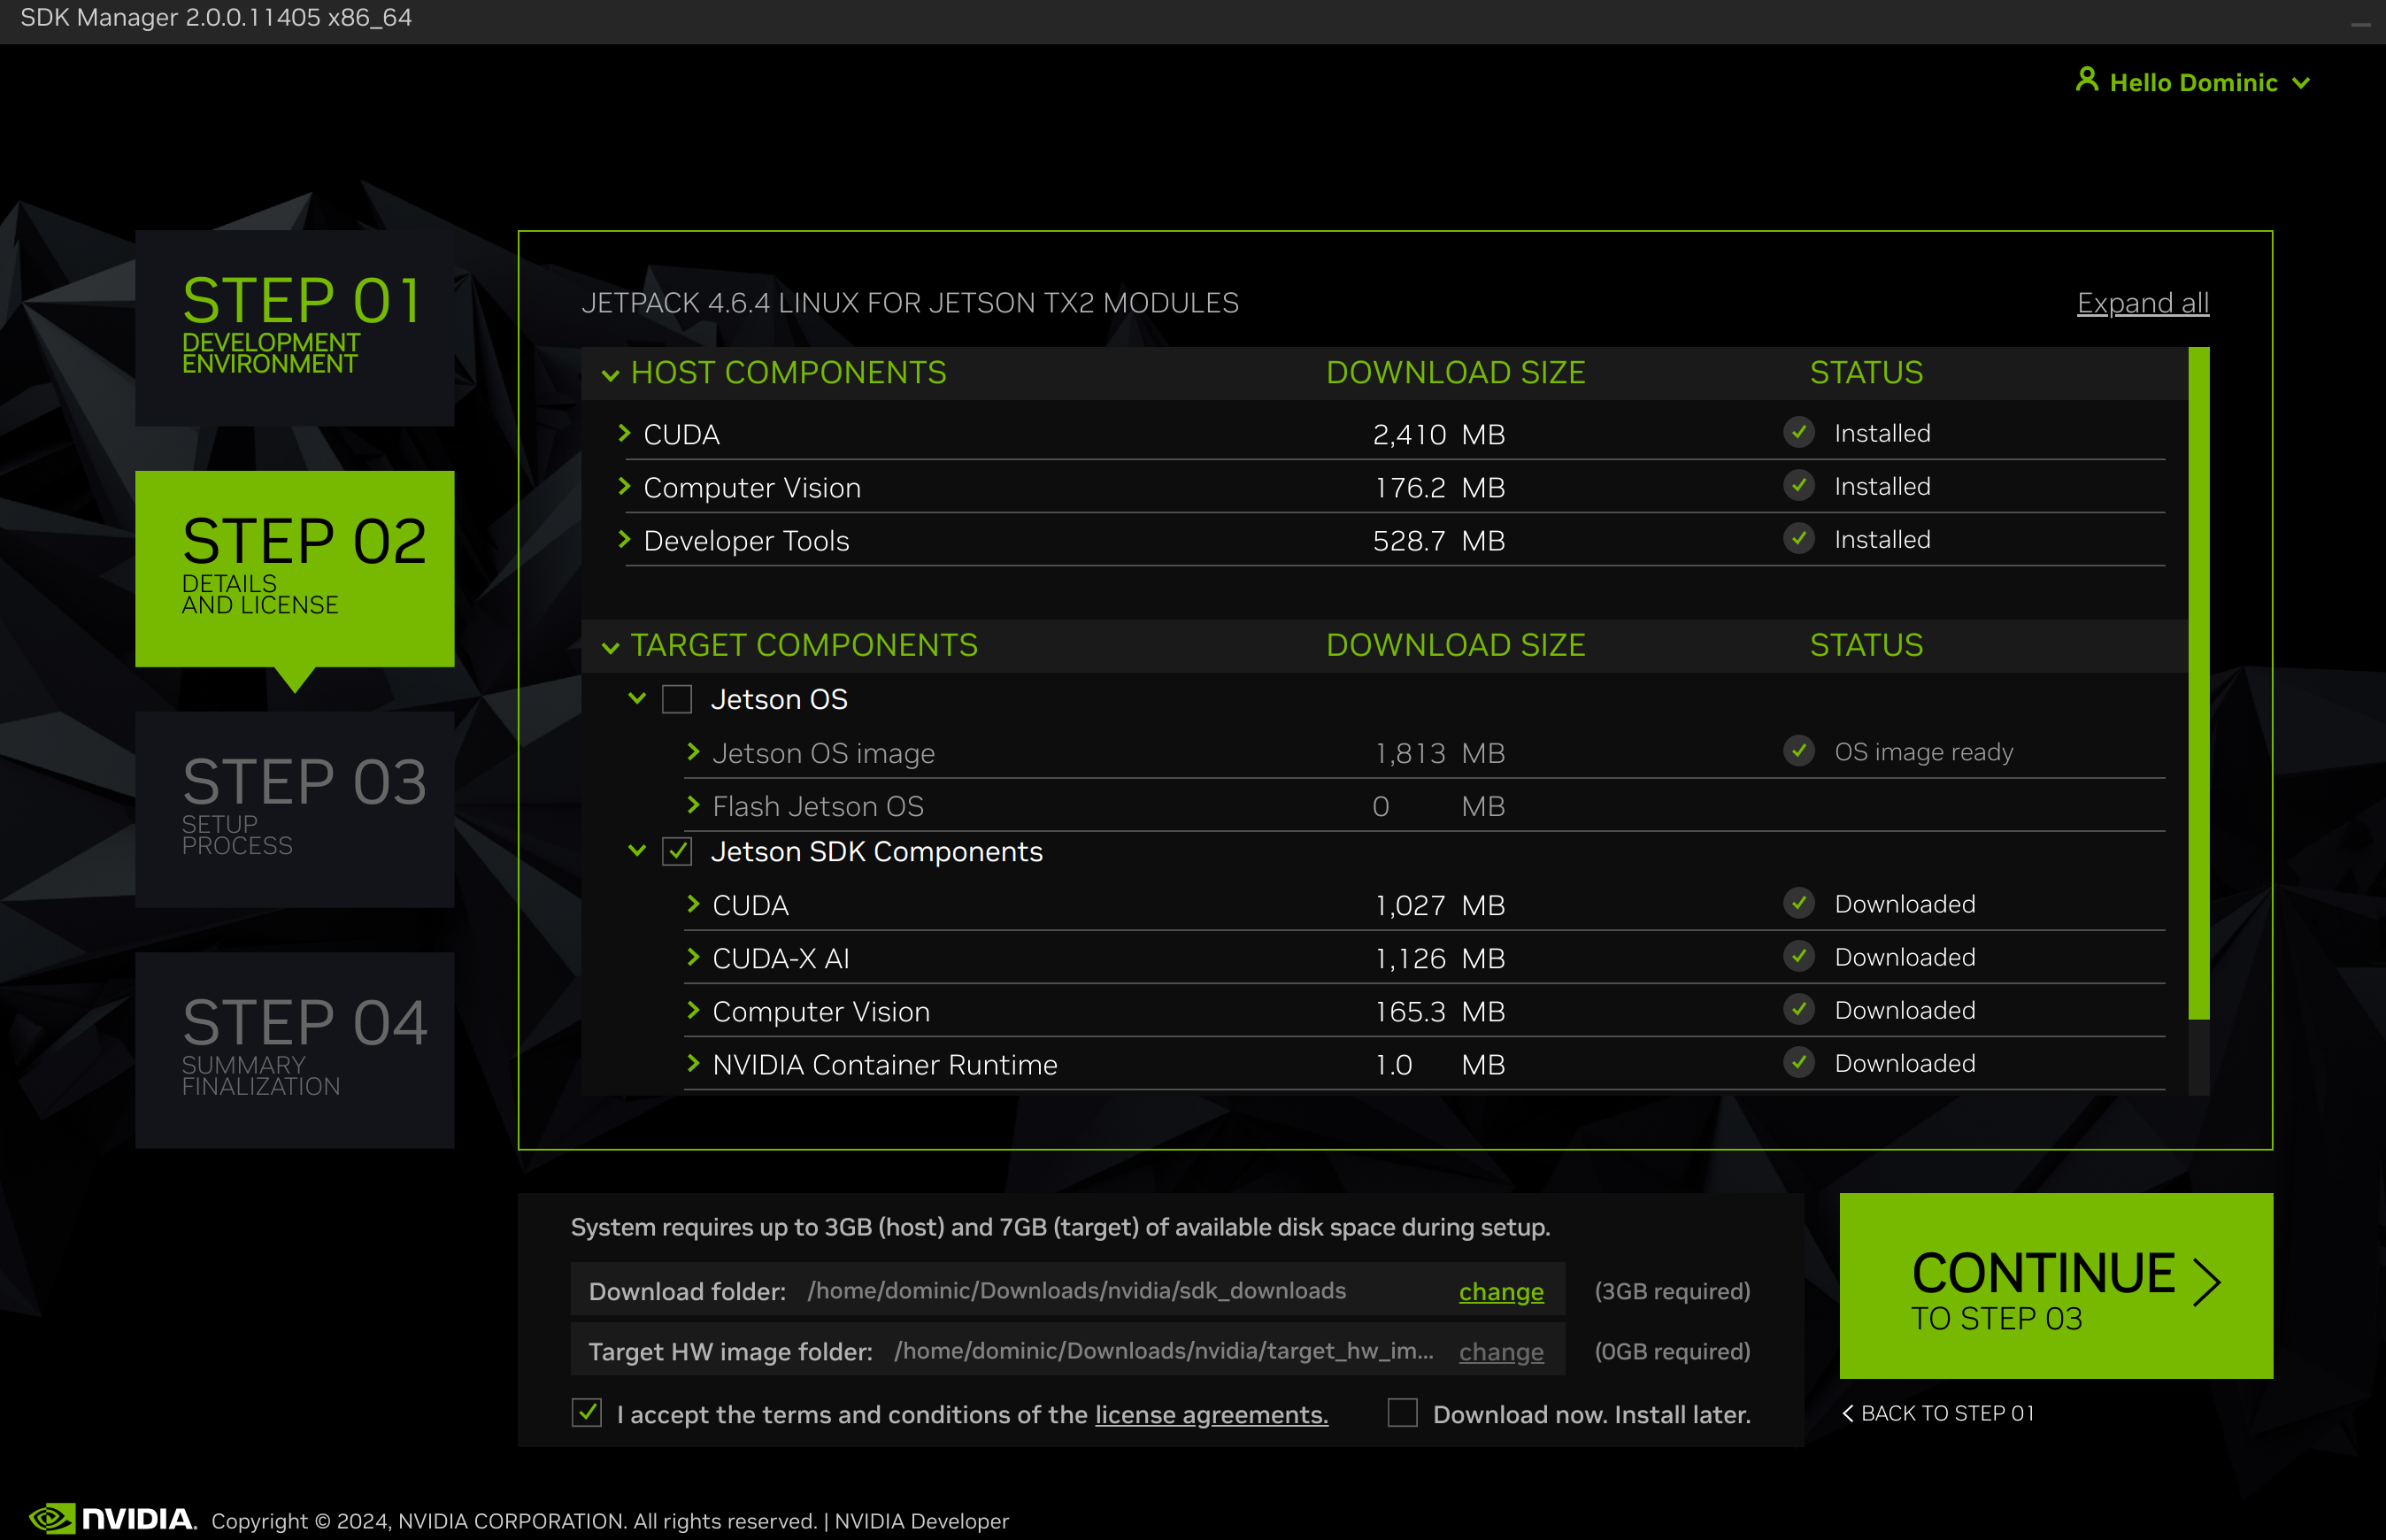
-
Check 'I accept the terms...' (if you do of course) and click 'Continue to step 3'
-
As we're connected via USB the next screen should prefill a few options, add your
UsernameandPasswordfor the device and clickInstall
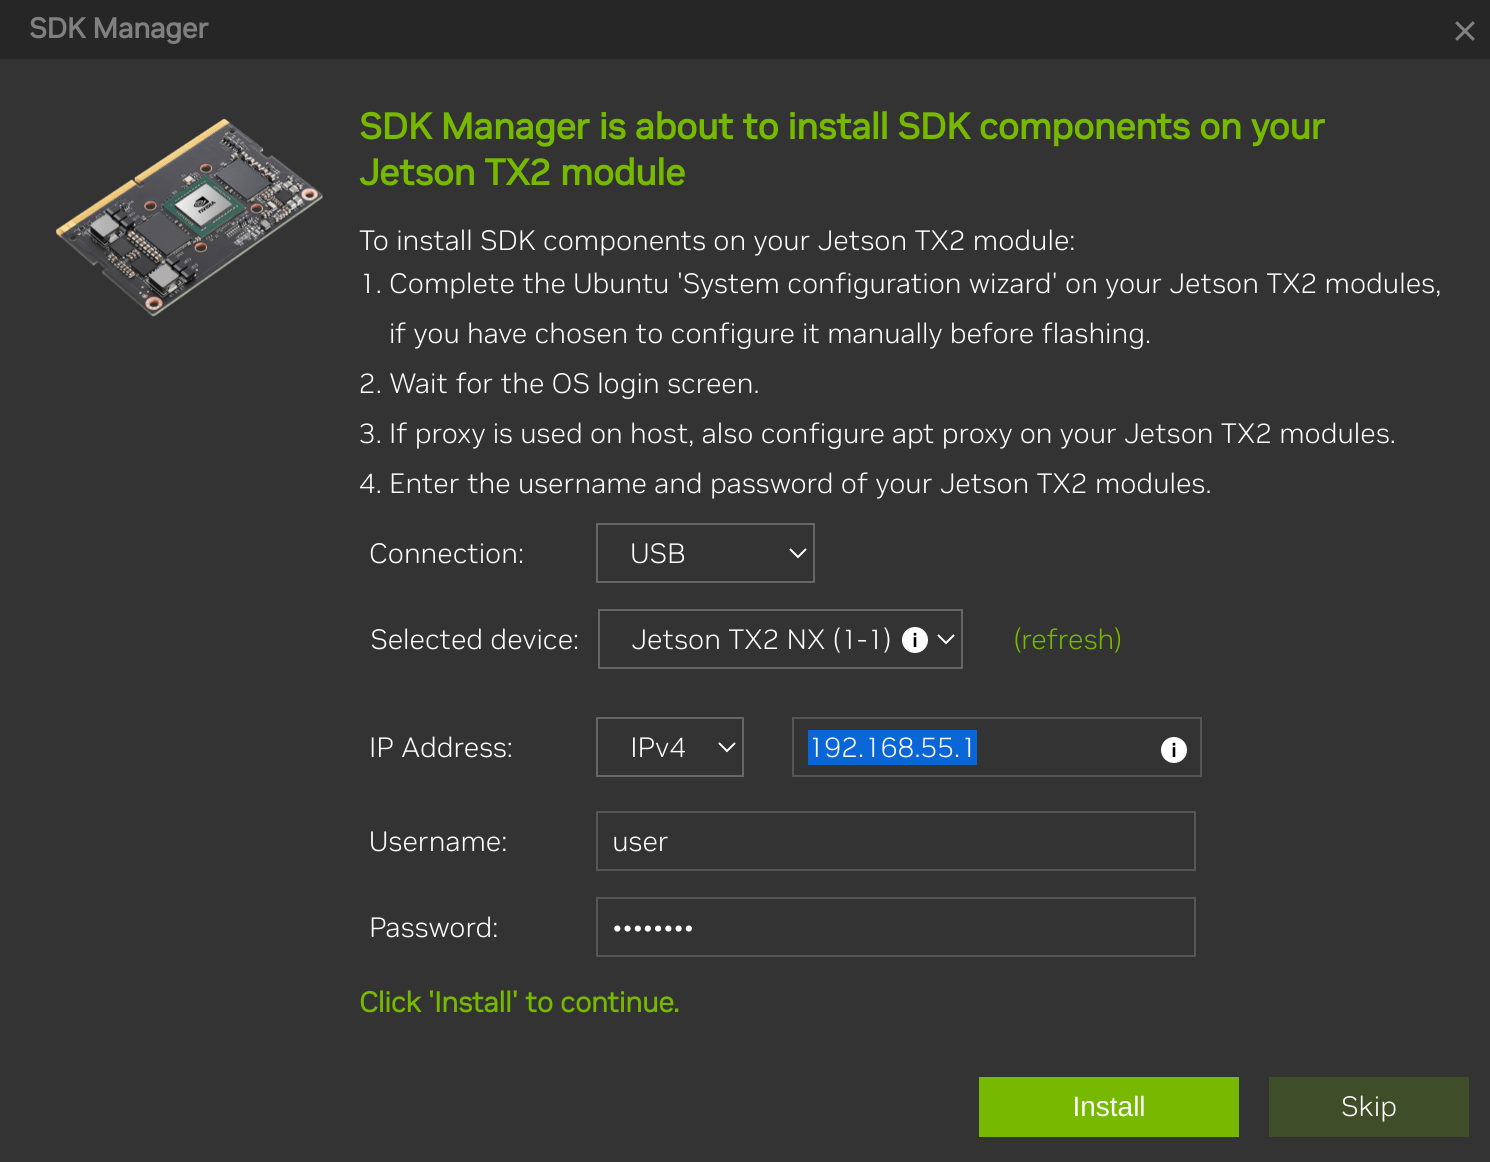
If, for some reason, the USB install fails you can try switching Connection to Network and installing over SSH.
Done
Once all the above is done, you can disconnect your module from the host computer.
Summary
You should now have a running NVIDIA Jetson TX2 NX module (booting from an NVMe SSD) in a Turing Pi cluster board ready for use for AI projects and pipelines.
In the next blog posts, I'll cover how to use the module remoately, install popular AI frameworks, start some simple AI projects, and setup simple AI pipelines.
Thank you for following along, and happy computing!