AI development environment on my homelab AI cloud with JupyterLab, TensorFlow, and PyTorch, on an NVIDIA Jetson TX2 NX module
Table of Contents
- Introduction
- Things you're going to need
- Run JupyterLab in a Docker container based on the NVIDIA L4T ML base images
- TensorFlow: Testing our JupyterLab and GPU setup
- PyTorch: Testing our JupyterLab and GPU setup
- Optional: Run JupyterLab / TensorFlow directly on the module
- Done
Introduction
Following my previous post on building a homelab AI cloud, I've set up a Turing Pi cluster board with an NVIDIA Jetson TX2 NX module.
Now, I aim to leverage this setup for an AI development environment, using Docker, JupyterLab, TensorFlow, and PyTorch to access the NVIDIA GPU for machine learning tasks, from any location — be it elsewhere within my home or remotely via my home VPN.
Fair warning: As we proceed, remember that the path may not be one-size-fits-all. The steps I share are from my own experiences, filtering out the errors along the way. You might come across other troubles, or even find simpler ways of doing things, but my hope is that by sharing this knowledge, you'll be equipped with the best chance of success. Be prepared to invest time, energy, and a modest amount of cash - after all, the rewards will be worth it. You should be as comfortable with the chance of breaking things and starting over. And, crucially, secure the blessing of your family; you might just disappear into your lab a little longer than expected.
Note: I have received no sponsorships from any companies or people mentioned in this article, although offers would be very welcome 😉.
Things you're going to need
A reminder, these worked for me, you might need to adjust for your own needs, but this walkthrough is based on the following:
- On the Server, the NVIDIA Jetson TX2 NX module, or access to any hosted device with an NVIDIA GPU:
- JetPack SDK installed
- Docker installed
- NVIDIA Container Runtime installed to enable GPU access within Docker containers
- SSH access setup
Refer to the previous post for initial setup details that I went through.
Run JupyterLab in a Docker container based on the NVIDIA L4T ML base images
NVIDIA provide Machine Learning containers pre-installed and configured to run on Jetson devices.
The l4t-ml docker images contain TensorFlow, PyTorch, JupyterLab, scikit-learn, scipy, Pandas, etc, pre-installed in a Python 3 environment that support releases of JetPack for the Jetson TX2 NX module.
I want to have JupyterLab start automatically in this container. I also wanted TensorFlow v2 (v2.7.0 seemed to be the compatible version for this module). So, I created a custom Docker image.
A reminder, if I've not typed it enough alread, my server is running on the NVIDA Jetson TX2 NX module, which is an ARM64 machine with Ubuntu 18.04. My instructions are based on these specs.
In this section:
- Build a custom Docker image
- Run the custom Docker image
- Follow
docker logs - Access JupyterLab from a browser
Build a custom Docker image
SSH to the server:
ssh user@serverCreate a project directory:
mkdir ~/jupyterlabs-l4t-mlcd ~/jupyterlabs-l4t-mlvi DockerfileCopy this Dockerfile and save into that directory:
# Use the specified base image# The Linux version on the Jetson TX2 NX module is Jetson Linux (L4T) R32.7.4# https://developer.nvidia.com/embedded/linux-tegra-r3274 there is no exact match# for the base image but 32.7.1 workedFROM nvcr.io/nvidia/l4t-ml:r32.7.1-py3
# Thanks to this blog for helping find the specific dependencies needed to install # the NVIDIA provided TensorFlow version for this device:# https://forums.developer.nvidia.com/t/failed-building-wheel-of-h5py/263322/9?u=dominicfallows
# Run the required commands to update and install packagesRUN apt-get update && apt-get install -y \    python3-pip \    pkg-config \    libhdf5-serial-dev \    hdf5-tools \    libhdf5-dev \    zlib1g-dev \    zip \    libjpeg8-dev \    liblapack-dev \    libblas-dev \    gfortran \    && ln -s /usr/include/locale.h /usr/include/xlocale.h \    && rm -rf /var/lib/apt/lists/*
# Install the specified Python packagesRUN pip3 install --verbose 'protobuf<4' 'Cython<3'
# Download and install TensorFlowRUN wget --no-check-certificate https://developer.download.nvidia.com/compute/redist/jp/v461/tensorflow/tensorflow-2.7.0+nv22.1-cp36-cp36m-linux_aarch64.whl \    && pip3 install --verbose tensorflow-2.7.0+nv22.1-cp36-cp36m-linux_aarch64.whl \    && rm tensorflow-2.7.0+nv22.1-cp36-cp36m-linux_aarch64.whl
# Upgrade PyTorchRUN pip3 install --verbose --upgrade torch
# Set up the environment for Jupyter LabWORKDIR /notebooksEXPOSE 8888
# Start Jupyter LabCMD ["jupyter", "lab", "--ip=0.0.0.0", "--no-browser", "--allow-root"]
From the ~/jupyterlabs-l4t-ml folder, run:
docker build -t jupyterlabs-l4t-ml .This may take some time. I also noticed some errors to do with the older version of Python on the base image (which is required for this module) however the build still succeeded after some time.
Run the custom Docker image
First we'll generate a secure token for Jupyter access and store it in a configuration file using openssl:
echo "c.NotebookApp.token = '$(openssl rand -hex 12)'" > ~/jupyter_notebook_config.pyThis command will generate a random 12-character hexadecimal token (you can choose a different size token by chaing 12 to something else) and save it in the ~/jupyter_notebook_config.py (in your home directory). Then, you can use this configuration file when starting your JupyterLab Docker container.
Run the Docker container with JupyterLab on the server:
docker run --runtime nvidia -d --rm --net=host \ -v /home/$USER/jupyter_notebooks:/notebooks \ -v ~/jupyter_notebook_config.py:/root/.jupyter/jupyter_notebook_config.py \ -v /usr/local/cuda/lib64:/usr/local/cuda/lib64 \ -v /usr/lib/aarch64-linux-gnu/libcudnn.so:/usr/lib/aarch64-linux-gnu/libcudnn.so \ jupyterlabs-l4t-mlYou can change /home/$USER/jupyter_notebooks to any directory you like on your server, this is where the files you create in JupyterLab/Notebook will be saved.
You'll notice I had to map the servers cuda/lib64 and libcudnn.so file to the container to get the GPU to work inside the container. This might not be the best way, but it worked for me.
The -d parameter runs the container in the background. You could change this to -it to get attach to an interactive shell to see debug logs, but I want to run this as a server so instead I follow the logs using the docker cli.
Follow docker logs
Find the ID of your running container:
docker psWhich should output something like:
CONTAINER ID IMAGE COMMAND CREATED STATUS PORTS NAMES223541bf771d jupyterlabs-tf2-l4t-ml "jupyter lab --ip=0.…" 7 seconds ago Up 5 seconds unruffled_spenceThen follow -f the logs:
docker logs -f 223541bf771dUsing either the interactive shell, or following the logs with the docker logs command you should see the logs of the server starting.
Access JupyterLab from a browser
To access JupyterLab, open a web browser on your client machine and navigate to http://<server-ip>:8888. Use the token you created in the server ~/jupyter_notebook_config.py file to login.
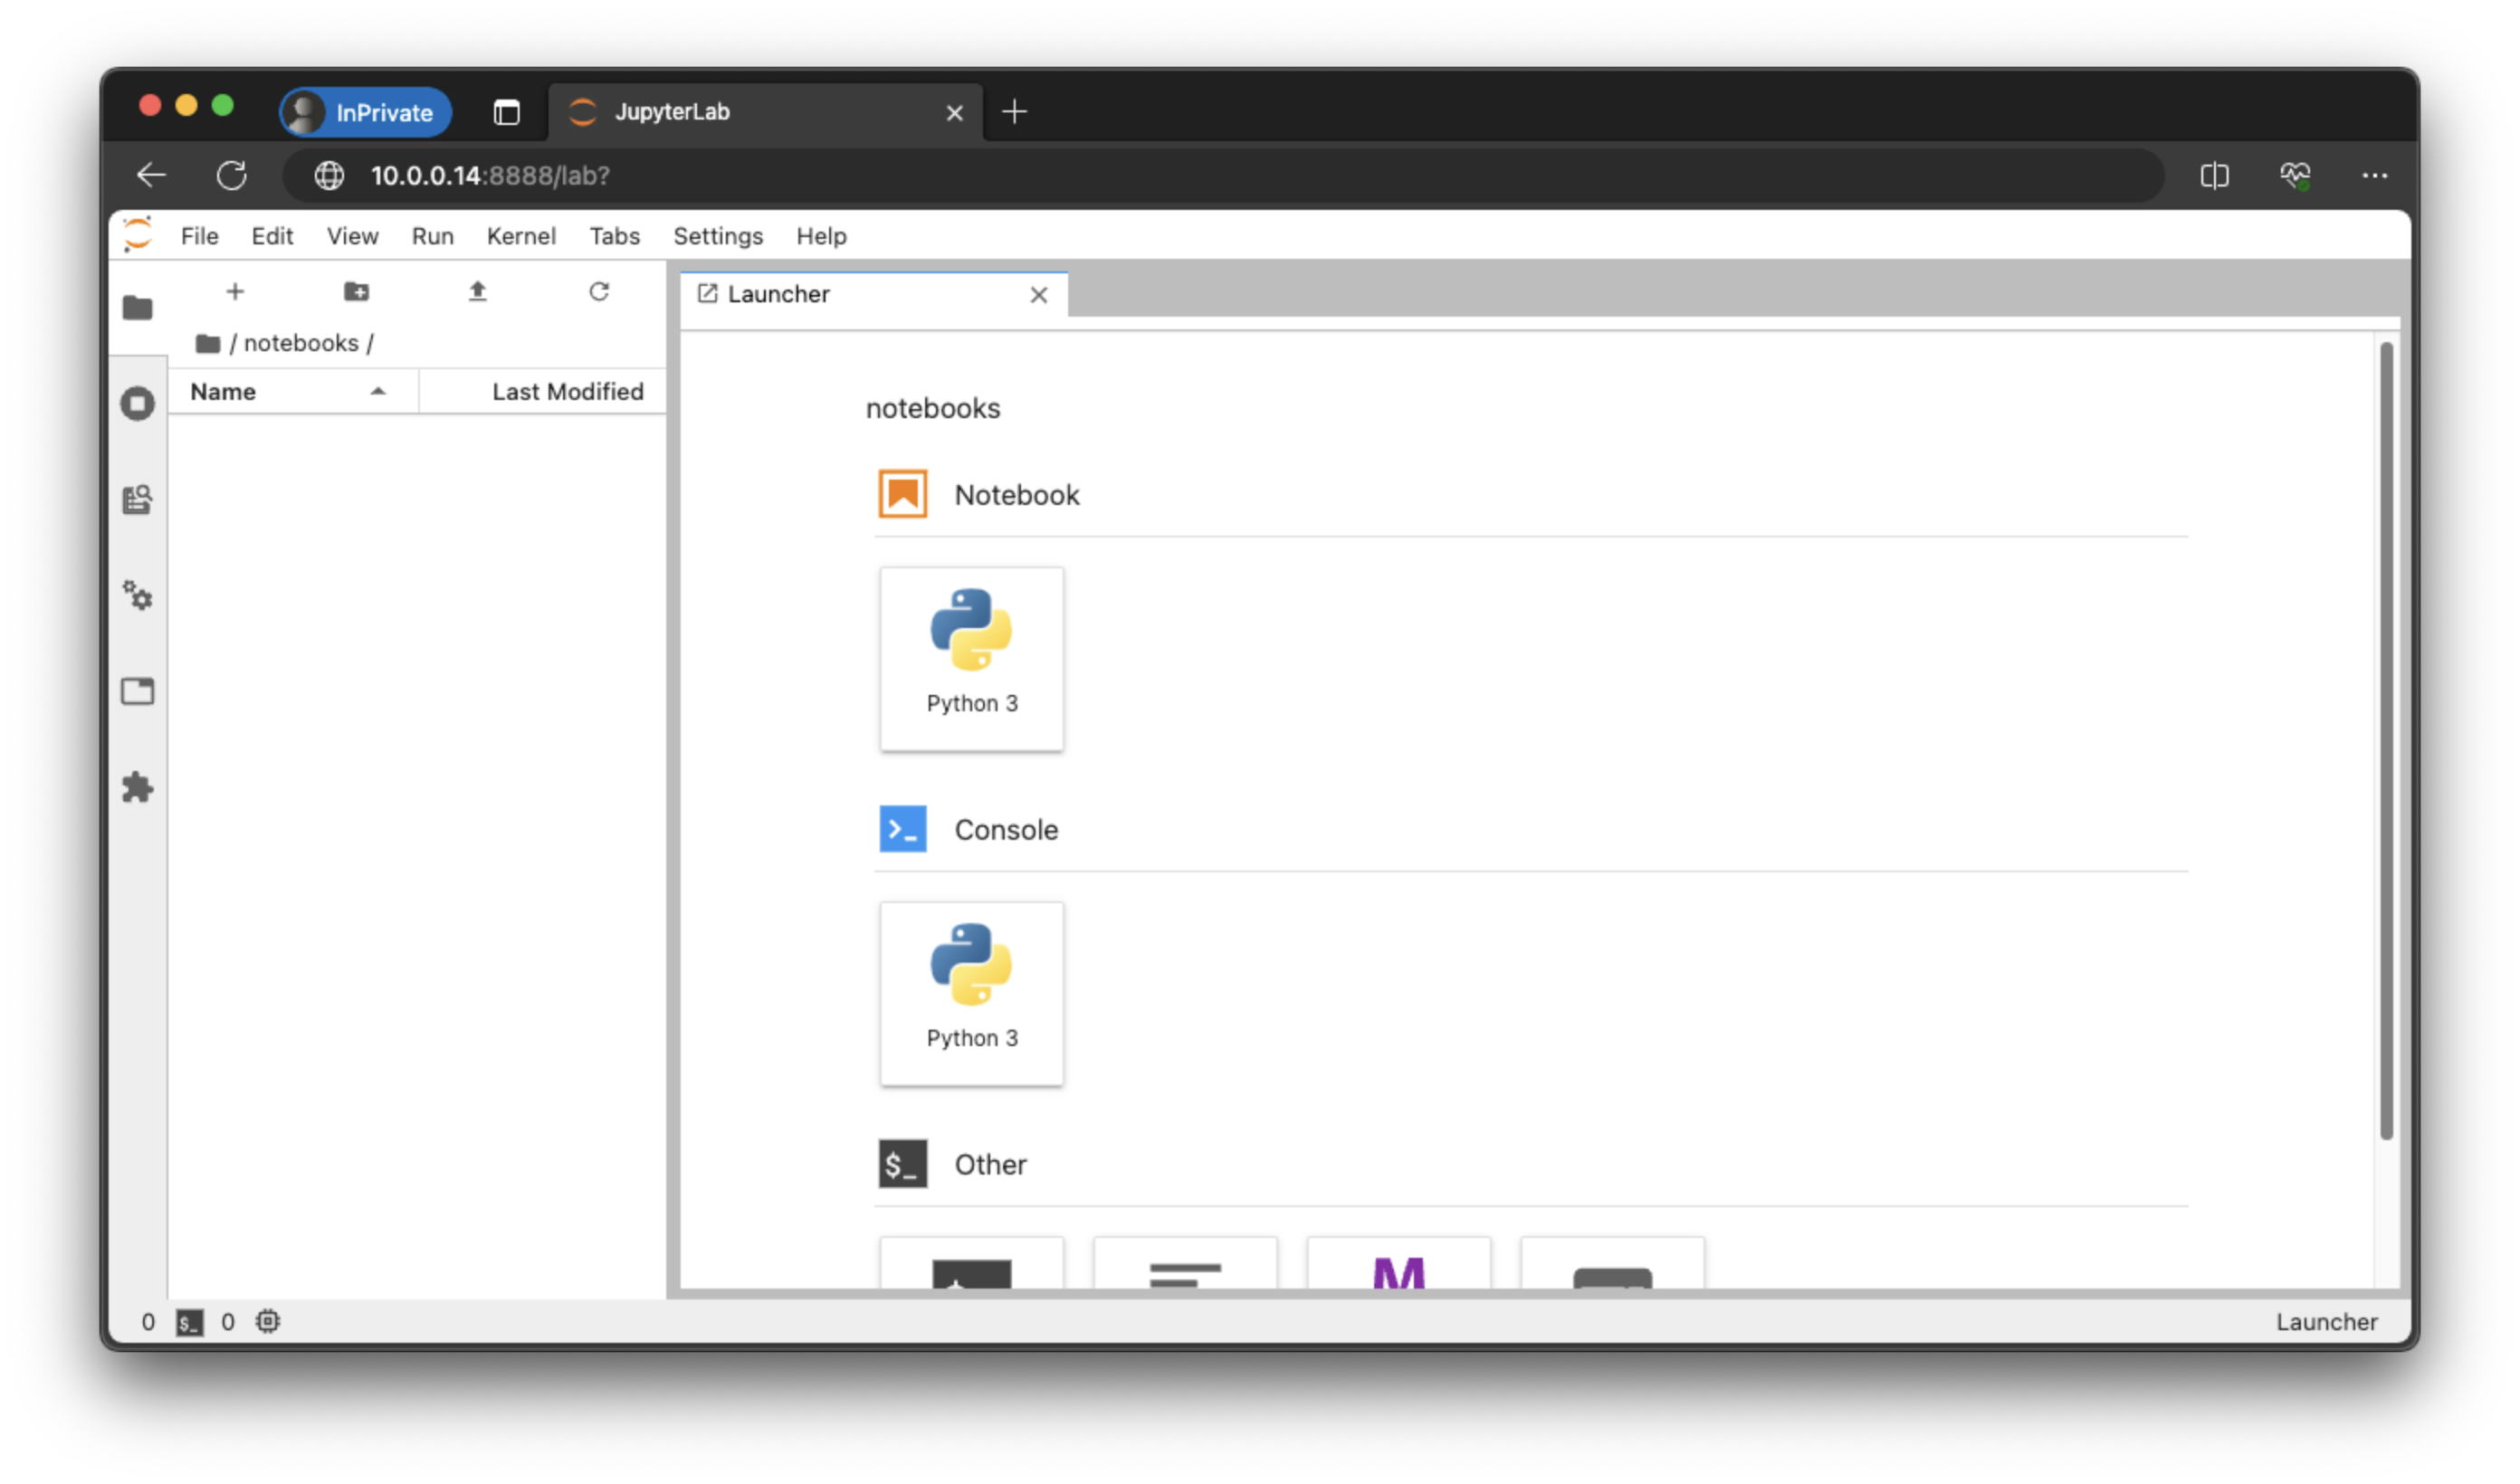
You should now see the JupyterLab Launcher screen in your browser.
TensorFlow: Testing our JupyterLab and GPU setup
Create a new Notebook by clicking on 'Python 3' under 'Notebook' or File > New > Notebook:

In this section:
- Test TensorFlow version
- See CPU and memory stats
- TensorFlow: List and setup our GPU devices
- TensorFlow: Simple GPU test by creating a simple TensorFlow operation
- TensorFlow: Compare GPU and CPU comparison with a larger matrix multiplication test
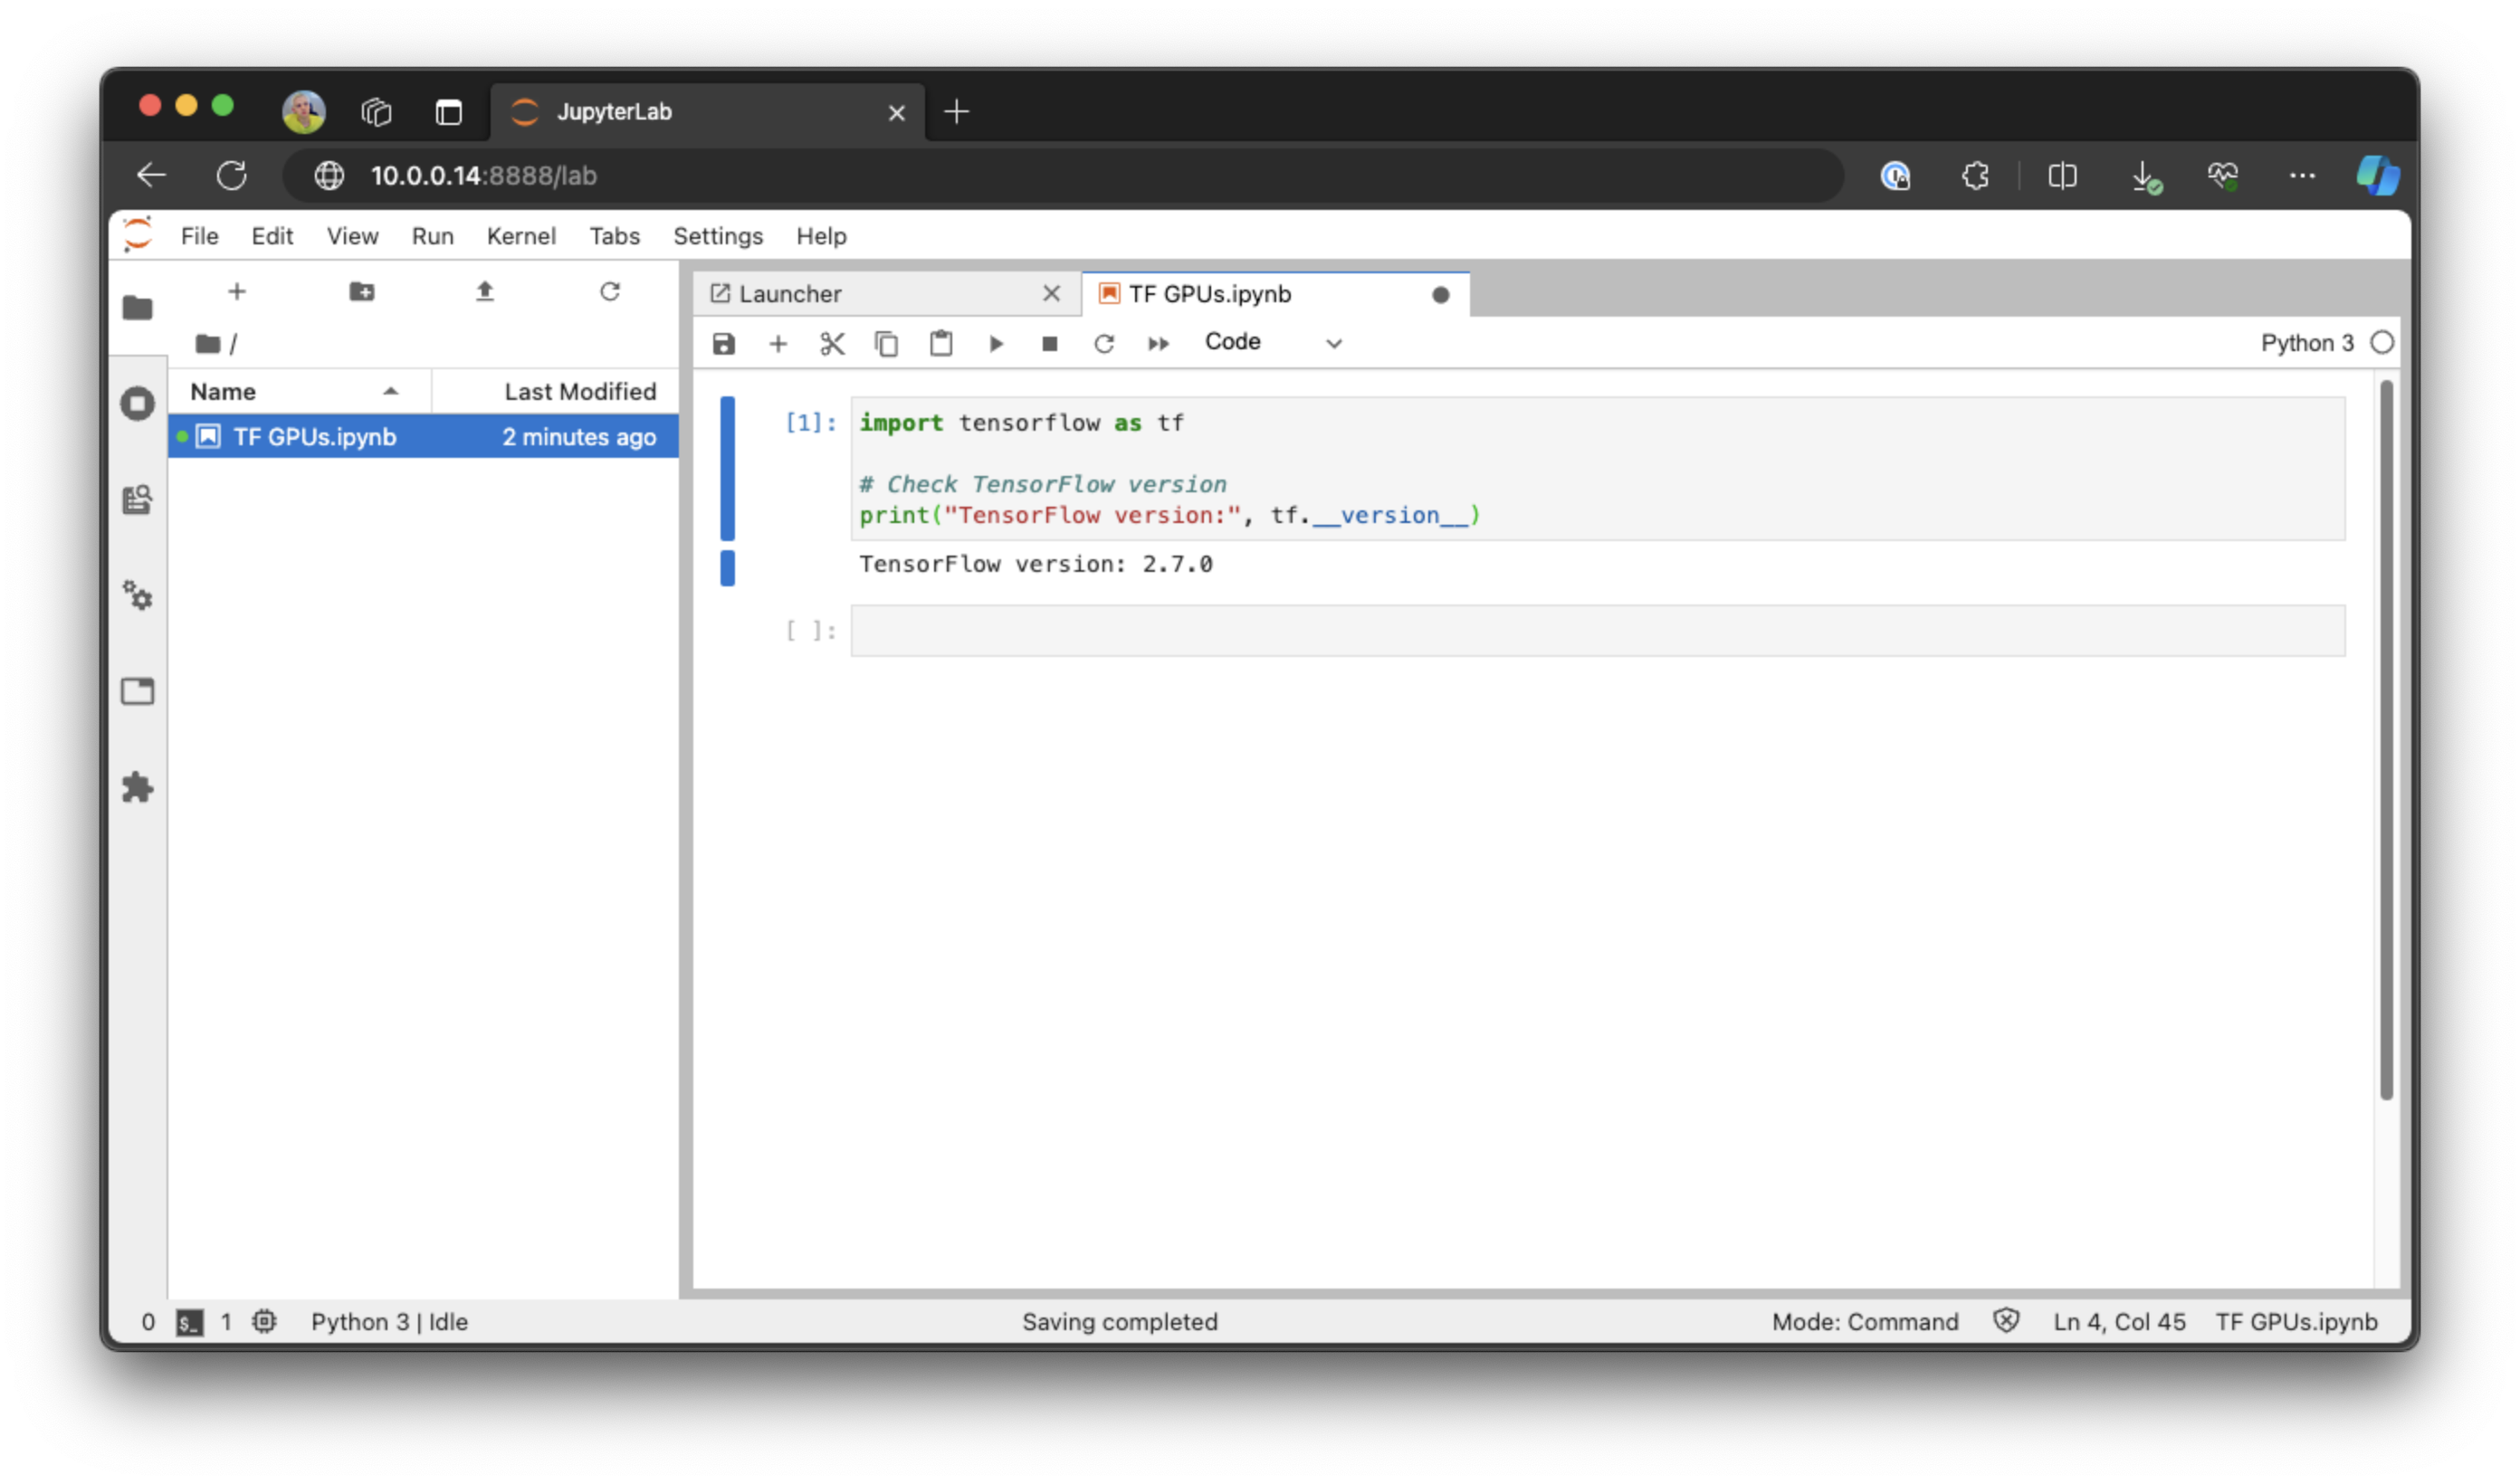
Test TensorFlow version
In a new code cell enter, and run:
import tensorflow as tf
# Check TensorFlow versionprint("TensorFlow version:", tf.__version__)
You should see: TensorFlow version: 2.7.0
See CPU and memory stats
In a new code cell enter, and run:
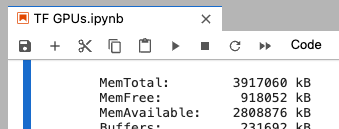
!cat /proc/cpuinfo!cat /proc/meminfo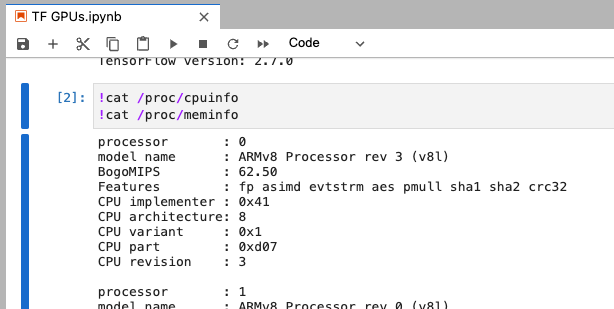
TensorFlow: List and setup our GPU devices
In a new code cell enter, and run:
# Example based on https://github.com/dudash/jupyter-gpu-examples/blob/main/3_tf_gpu_cpu_comparison.ipynbimport tensorflow as tf
gpus = tf.config.list_physical_devices('GPU')
if gpus:    try:        # Tell TF to only allocate only as much GPU memory as needed for runtime allocations        # Currently, memory growth needs to be the same across GPUs        for gpu in gpus:            tf.config.experimental.set_memory_growth(gpu, True)            logical_gpus = tf.config.experimental.list_logical_devices('GPU')                        print("Physical GPUs: ", len(gpus))            print("Logical GPUs", len(logical_gpus))            print()                        print("GPU information:")            print(gpus)                    except RuntimeError as e:        # Memory growth must be set before GPUs have been initialized        print(e)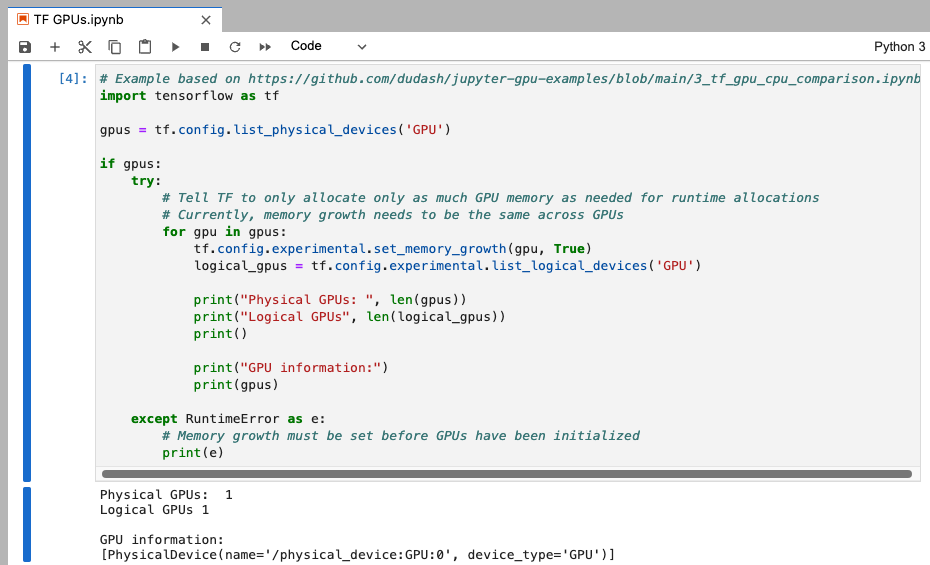
TensorFlow: Simple GPU test by creating a simple TensorFlow operation
In a new code cell enter, and run:
with tf.device('/GPU:0'): a = tf.constant([[1.0, 2.0, 3.0], [4.0, 5.0, 6.0]]) b = tf.constant([[1.0, 2.0], [3.0, 4.0], [5.0, 6.0]]) c = tf.matmul(a, b)print("Matrix multiplication result:\n", c)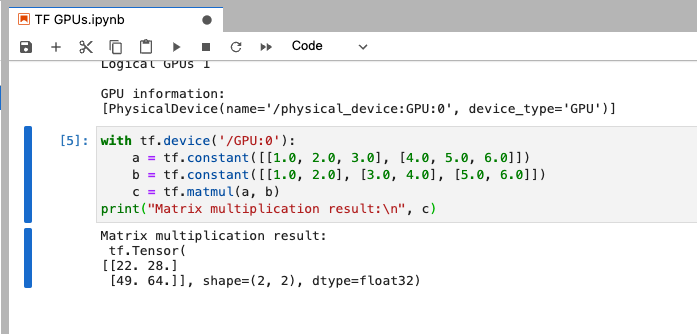
TensorFlow: Compare GPU and CPU comparison with a larger matrix multiplication test
In a new code cell enter, and run:
# Example from https://github.com/dudash/jupyter-gpu-examples/blob/main/3_tf_gpu_cpu_comparison.ipynbimport time
def measure(x, steps):    # TensorFlow initializes a GPU the first time it's used, exclude from timing.    tf.matmul(x, x)    start = time.time()    for i in range(steps):        x = tf.matmul(x, x)    # tf.matmul can return before completing the matrix multiplication    # (e.g., can return after enqueing the operation on a CUDA stream).    # The x.numpy() call below will ensure that all enqueued operations    # have completed (and will also copy the result to host memory,    # so we're including a little more than just the matmul operation time).    _ = x.numpy()    end = time.time()    return end - start
shape = (1000, 1000)steps = 200print("Time to multiply a {} matrix by itself {} times:".format(shape, steps))
# Run on CPU:with tf.device("/cpu:0"):    cpu_time1 = measure(tf.random.normal(shape), steps)    print("CPU: {} secs".format(cpu_time1))
# Run on GPU, if available:if tf.config.list_physical_devices("GPU"):    with tf.device("/gpu:0"):        gpu_time1 = measure(tf.random.normal(shape), steps)        print("GPU: {} secs".format(gpu_time1))else:    print("GPU: not found")
print('GPU speedup over CPU: {}x'.format(int(cpu_time1/gpu_time1)))
This will take a little while longer, but wow look at the comparison of time between the CPU and GPU, even on this basic Jetson module:
Time to multiply a (1000, 1000) matrix by itself 200 times:CPU: 15.721359014511108 secsGPU: 0.8005008697509766 secsGPU speedup over CPU: 19x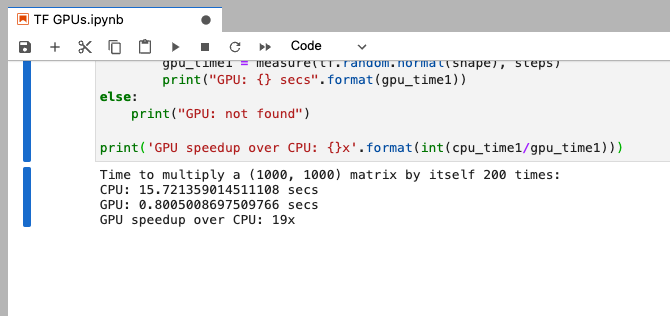
PyTorch: Testing our JupyterLab and GPU setup
Create a new Notebook (to make sure the TensorFlow tests aren't afffecting our PyToch tests).
Note: I didn't update the l4t-ml base image version of PyTorch as we have an older Python limitation. I might dig into this further in future experiments.
In this section:
- Test PyTorch version
- PyTorch: List GPU / CUDA Devices
- PyTorch: Simple GPU Tensor test
- PyTorch: Compare GPU and CPU performance with a larger operation
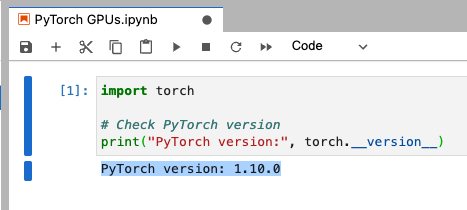
Test PyTorch version
In a new code cell enter, and run:
import torch
# Check PyTorch versionprint("PyTorch version:", torch.__version__)
You should see: PyTorch version: 1.10.0
PyTorch: List GPU / CUDA Devices
In a new code cell enter, and run:
# Check if CUDA is availableprint("CUDA available:", torch.cuda.is_available())
# Get CUDA device countprint("CUDA device count:", torch.cuda.device_count())
# List CUDA devicesif torch.cuda.is_available():    print("CUDA devices:")    for i in range(torch.cuda.device_count()):        print(f"  Device {i}: {torch.cuda.get_device_name(i)}")else:    print("No CUDA devices available.")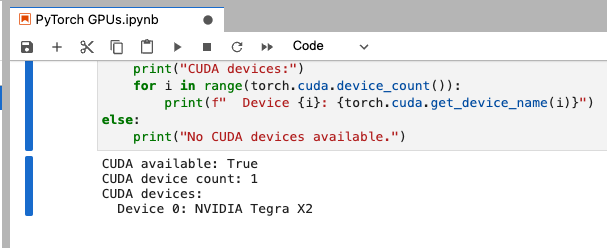
PyTorch: Simple GPU test by creating a simple tensor addition
In a new code cell enter, and run:
# Perform a simple tensor addition on the GPUif torch.cuda.is_available():    # Create tensors    x = torch.tensor([1.0, 2.0, 3.0]).cuda()    y = torch.tensor([4.0, 5.0, 6.0]).cuda()
    # Add tensors    z = x + y
    # Bring the result back to CPU for printing    print("Result of tensor addition on GPU:", z.cpu().numpy())else:    print("CUDA not available, cannot perform tensor addition on GPU.")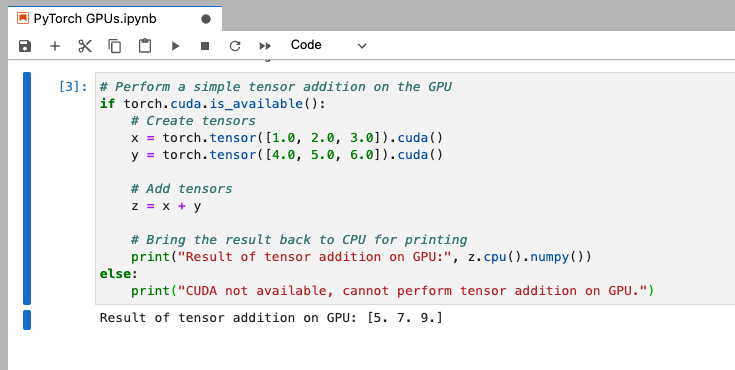
PyTorch: Compare GPU and CPU comparison with a larger operation
In a new code cell enter, and run:
# Compare GPU and CPU performance with a larger operationimport time
def measure_pytorch(x, steps, device):    start = time.time()    for _ in range(steps):        x = (x + x).to(device)    end = time.time()    return end - start
size = 5000steps = 200x_cpu = torch.rand(size, size)x_gpu = x_cpu.cuda()
# Warm-up_ = measure_pytorch(x_cpu, 10, 'cpu')if torch.cuda.is_available():    _ = measure_pytorch(x_gpu, 10, 'cuda')
# Measure CPUcpu_time = measure_pytorch(x_cpu, steps, 'cpu')print(f"CPU time for {steps} steps: {cpu_time:.2f} seconds")
# Measure GPUif torch.cuda.is_available():    gpu_time = measure_pytorch(x_gpu, steps, 'cuda')    print(f"GPU time for {steps} steps: {gpu_time:.2f} seconds")    print(f"GPU speedup over CPU: {cpu_time/gpu_time:.2f}x")else:    print("CUDA not available, cannot perform operations on GPU.")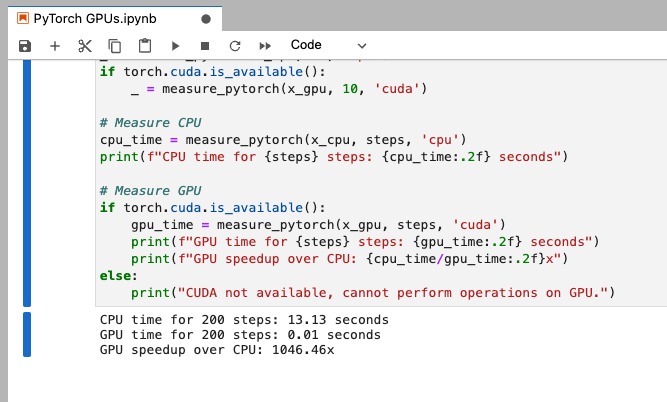
Again, like with TensorFlow, an impressive performance increase when using the GPU over CPU for operations like this.
Optional: Run JupyterLab / Tensorflow directly on the module
For my homelab AI cloud, I run things in Docker containers. However, you could optionally choose to run Jupyter / Tensorflow directly on the NVIDA Jetson TX2 NX. I've compiled a few commands that do this, based on various posts I've found - but mostly this one
git config --global user.email "[YOUR EMAIL]"git config --global user.name "[YOUR NAME]"
sudo apt-get updatesudo apt-get install libhdf5-serial-dev hdf5-tools libhdf5-dev zlib1g-dev zip libjpeg8-dev liblapack-dev libblas-dev gfortransudo apt-get install python3-pipsudo pip3 install -U pip testresources setuptoolssudo ln -s /usr/include/locale.h /usr/include/xlocale.hpip3 install --verbose 'protobuf<4' 'Cython<3'pip3 install pkgconfigcd ~ && git clone https://github.com/h5py/h5py.git && cd h5py && git checkout 3.1.0 && git cherry-pick 3bf862daa4ebeb2eeaf3a0491e05f5415c1818e4 && env H5PY_SETUP_REQUIRES=0 pip3 install . --no-deps --no-build-isolationsudo pip3 install -U numpy==1.19.4 future mock keras_preprocessing keras_applications gast==0.2.1 protobuf pybind11 packagingsudo pip3 install --extra-index-url https://developer.download.nvidia.com/compute/redist/jp/v461 tensorflow
Done
This manual setup of the GPU-accelerated JupyterLab server on my homelab AI cloud adds to my AI experimentation and development setup allowing for easy code testing that benefits from the computational advantages that NVIDIA GPU acceleration offers over traditional CPU processing. The performance gains demonstrated in the testing sections, for both TensorFlow and PyTorch, underscore the efficiency and utility of this setup for AI projects.
Moving forward, I aim to bolster the system's robustness and efficiency. To achieve this, I plan to delve into Docker Compose to manage container deployment more effectively and to investigate the implementation of a reverse proxy using tools like nginx or traefik to facilitate secure access from outside the local network. Keep an eye out for upcoming posts where I'll explore these enhancements in more detail.